달력

5

« 2024/5 »

  • 1
  • 2
  • 3
  • 4
  • 5
  • 6
  • 7
  • 8
  • 9
  • 10
  • 11
  • 12
  • 13
  • 14
  • 15
  • 16
  • 17
  • 18
  • 19
  • 20
  • 21
  • 22
  • 23
  • 24
  • 25
  • 26
  • 27
  • 28
  • 29
  • 30
  • 31
2008. 11. 16. 14:01

[구버전] 하늘아리 for wow3.03 It's Me/와우2008. 11. 16. 14:01


출처 : http://wow.gamemeca.com/


하늘아리 for wow3.03 


설치시 주의사항

- 직업별 애드온과 원백가방 애드온은 기본적으로 설치체크가 되어 있지 않습니다.

   자신에게 맞는 직업을 체크하시고 설치하세요.

- 3.02용 하늘아리 부터는 설치시 무조건 기존 Addon 폴더와 WTF폴더를 다른 이름으로 수정 백업후
   설치됩니다. 기존 설정을 사용하시려면 백업된 WTF를 다시 WTF로 바꾸신 후 사용하시면 됩니다.

- 첫 설치시 에러가 발생할 수 있습니다. 이럴 때는 와우 클라이언트를 재시작 또는 UI 재시작을 하시면 
  해당 에러는 더이상 발생하지 않습니다.


마카룬! 바 (센터바 및 팝바) 사용시 주의사항


- 반드시 마법창의 스킬 또는 인벤토리의 아이템만 올려놓으시기 바랍니다.
  매크로를 만든 것을 그대로 올려놓으시면 기본 액션바와 연동되어버리는 현상이 있습니다.

- 매크로를 사용하시려면 "버튼 편집모드"에서 직접 버튼에 매크로를 적어서 사용하세요  

:
Posted by 라면스프

출처 : http://docs.sun.com/app/docs/doc/819-4673/gbpxu?l=ko&a=view


BEA WebLogic Server

Consider making the following changes:


JVM GC Parameter

For BEA WebLogic Server 8.1 SP4, to avoid the java.lang.OutofMemoryError reported by the WebLogic JVM 1.4.2_05, add the following JVM GC (garbage collection) parameter in the startWebLogic.sh JAVA_OPTIONS:

-XX:-CMSParallelRemarkEnabled

Set this parameter in addition to the other heap size and GC parameters that have been added for JVM 1.4.2 for Application Server 8.1 and Web Server 6.1.

For example, if Access Manager is installed in the default user_projects location (/usr/local/bea/user_projects/domains/mydomain/startWebLogic.sh):

JAVA_OPTIONS="-XX:+DisableExplicitGC -XX:+UseParNewGC
-XX:+UseConcMarkSweepGC -XX:+CMSPermGenSweepingEnabled
-XX:+UseCMSCompactAtFullCollection -XX:CMSFullGCsBeforeCompaction=0
-XX:+CMSClassUnloadingEnabled -XX:-CMSParallelRemarkEnabled
-XX:SoftRefLRUPolicyMSPerMB=0 -XX:+PrintClassHistogram
-XX:+PrintGCTimeStamps
-Xloggc:/usr/local/bea/user_projects/domains/mydomain/myserver/gc.log"

If you use WebLogic 9.x with Sun JVM 1.5 or later, then some of the GC algorithms can be safely removed. The following is a list of JVM options that can be used with Sun JVM 1.5 or later.

-XX:NewSize=336M -XX:MaxNewSize=336M
-XX:+DisableExplicitGC
-XX:+UseParNewGC
-XX:+UseConcMarkSweepGC
-XX:+PrintClassHistogram
-XX:+PrintGCTimeStamps
-Xloggc:/opt/WebSphere/AppServer/logs/server1/gc.log
-XX:-CMSParallelRemarkEnabled 

Heap Size

Modify the commonEnv.sh script in the /usr/local/bea/weblogic81/common/bin directory for heap size increases in the section where $PRODUCTION_MODE" = "true" (which should be set to true, before running Access Manager in /usr/local/bea/user_projects/domains/mydomain/startWebLogic.sh):

# Set up JVM options base on value of JAVA_VENDOR
if [ "$PRODUCTION_MODE" = "true" ]; then
  case $JAVA_VENDOR in
  BEA)
    JAVA_VM=-jrockit
    MEM_ARGS="-Xms128m -Xmx256m"
  ;;
  HP)
    JAVA_VM=-server
    MEM_ARGS="-Xms32m -Xmx200m -XX:MaxPermSize=128m"
  ;;
  IBM)
    JAVA_VM=
    MEM_ARGS="-Xms32m -Xmx200m"
  ;;
  Sun)
    JAVA_VM=-server
    MEM_ARGS="-Xms2688M -Xmx2688M -XX:NewSize=336M -XX:MaxNewSize=336M"
   # MEM_ARGS="-Xms32m -Xmx200m -XX:MaxPermSize=128m"

Execute Queue Thread Count

Set the Execute Queue Thread count to be more than the number of CPUs. For example, consider using a value that is twice the number of CPUs. Set this value in either the console or in the /usr/local/bea/user_projects/domains/mydomain/config.xml file:

<ExecuteQueueName="MyExecute Queue" ThreadCount="8" ThreadsIncrease="4"/>

For more information, see “Modifying the Default Thread Count” in “WebLogic Server Performance and Tuning” at:

http://e-docs.bea.com/wls/docs81/perform/WLSTuning.html#1142218

Connection Backlog Buffering

A guideline for setting Connection Backlog Buffering is 8192 for a server with 4 Gbytes of physical memory (which is equivalent to the ConnectionQueue size tuning set in the Sun Java System Web Server 6.1 magnus.conf file).

For more information, see “Tuning Connection Backlog Buffering” in the “WebLogic Server Performance and Tuning” document at:

http://e-docs.bea.com/wls/docs81/perform/WLSTuning.html#1136287

:
Posted by 라면스프
2008. 11. 15. 13:09

WebLogic Tuning Guide on Linux Enjoy/etc2008. 11. 15. 13:09


출처 : http://www.adminschool.net/wiki/doku.php?id=service:was:weblogic:wltunning


WebLogic Tuning Guide on Linux

OS limit Setting

  1. vi /etc/security/limits.conf
    *       soft    nproc       16384
    *       hard    nproc       16384
    *       soft    nofile      65536
    *       hard    nofile      65536
    
  2. 필요에 따라서 .bash_profile 이나 .bashrc 를 수정한다.
    ulimit -Hn 8192
    ulimit -Sn 8192
    

OS Kernel Tuning

  1. 현재 설정을 확인해 본다.
    # su -
    # sysctl -a
    
  2. 변경할 셋팅값을 /etc/sysctl.conf 에 입력한다.
    kernel.msgmni = 1024
    net.ipv4.tcp_max_syn_backlog = 8192
    
  3. 필요에 따라 다음 커널 값들을 수정(/etc/sysctl.conf)한다.(정확히 알지 못한다면 수정하지 말것.)
    # weblogic + apache2 (testing)
    ## net.ipv4.tcp_keepalive_time = 7200
    ## net.ipv4.tcp_keepalive_intvl = 75
    ## net.ipv4.tcp_keepalive_probes = 9
    #
    net.ipv4.tcp_fin_timeout = 15
    net.ipv4.tcp_keepalive_time = 60
    net.ipv4.tcp_keepalive_intvl = 60
    net.ipv4.tcp_keepalive_probes = 1


WebLogic Setting

  • JDBC Connection Pool > Connections 설정에 Test Reserved Connections 옵션을 체크한다.

: DB 연결이 끊어지고 다시 연결할때 DB 접속을 시도하는 옵션이다.
이 옵션이 체크되어 있지 않은 상태에서 DB 연결이 끊어지고 나면 DB 연결을 더 이상 하지 않는다.

  • Services > JMS > Connection Factories > cgQueue 에서 Target and Deploy 에서 Independent Servers의 Target을 선택한다.

: 이 옵션을 선택하지 않으면 아래와 같은 에러가 나올 수 있다.

<2007. 3. 30. 오후 4시 24분 20초 KST> <Warning> <J2EE> <BEA-160082> <There was an error while making the initial 
connection to the JMS resource named weblogic.jws.jms.QueueConnectionFactory from the EJB "StatelessContainer" 
inside application "beflyt". The server will attempt the connection again later. The error was 
javax.jms.JMSException: [J2EE:160048]JNDI lookup of the JMS connection factory 
weblogic.jws.jms.QueueConnectionFactory failed: javax.naming.NameNotFoundException: While trying to 
lookup 'weblogic.jws.jms.QueueConnectionFactory' didn't find subcontext 'jws' Resolved weblogic; remaining 
name 'jws/jms/QueueConnectionFactory'>

Memory Tuning

  1. JDK 변경
    • weblogic을 설치하면 기본적으로 jrockit 과 Sun JDK 가 설치되어 있다. 하나를 선택한다면 Sun JDK를 선택하는 것을 권고한다.
    • OS에서 제공하는 JDK가 있다면, OS 제공하는 JDK를 사용하는 것이 성능적으로 우수할 수 있다.
  2. MEM_ARGS 옵션 변경
    MEM_ARGS="-Xms1024m -Xmx1024m -XX:NewSize=367m -XX:MaxNewSize=367m -XX:PermSize=128m -XX:MaxPermSize=128m -XX:SurvivorRatio=2"
    JAVA_VM="-server"
    

Servers/JDBC Tuning

  • 서버 설정값 Development and Production Startup Mode Tuning Defaults
Tuning Parameter Development Mode Default Production Mode Default
Execute Queue: ThreadCount 15 threads 25 threads
JDBC Connection Pool: MaxCapacity 15 connections 25 connections
  • 현재 회사에서 운영중인 서버 설정
location Name values
JDBC Connection Pool: Connections Initial Capacity 25
JDBC Connection Pool: Connections Maximum Capacity 200
JDBC Connection Pool: Connections Capacity Increment 5
Servers: Execute Queue Thread Count 25
  • Thread Count 와 JDBC Connection Pool Count 는 일치시켜 주는 것이 성능상 좋다.
  • [{domain}] - [Servers] - [{server name}] - 'Configuration' - 'Tuning'
    1. MSI File Replication Enabled : 서버가 시작될때 어드민 콘솔에 접근이 안되면 이전 MSI 값으로 기동된다.
      NoStage 모드일때 적절한 값이다.
  • [{domain}] - [Servers] - [{server name}] - 'Logging' - 'Server'
    1. Server File Name : The name of the file that stores this server's current log messages.
      If the pathname is not absolute, the path is assumed to be relative to the root directory of the machine on which this server is running.
      필요가 없다면 '/dev/null'로 설정한다.
    2. Log to Stdout : Specifies whether the server should send messages to standard out
  • [{domain}] - [Servers] - [{server name}] - 'Logging' - 'Server'
    1. Enable HTTP Logging : 웹로그가 필요하지 않다면 체크를 해제한다.
  • [{domain}] - [Services] - [JDBC] - [Connection Pools] - 'Configuration' - '{Pool Name}' - “Configuration' - 'Connections' - 'Advanced Options'
    1. Allow Shrinking : 'Shrink Frequency(sec)'마다 JDBC Connection Pool을 확인하고 사용하지 않는 Pool은 연결해제시킨다.
    2. Enable Connection Leak Profiling : JDBC Connection leak을 수집, 해결한다.
    3. Test Reserved Connections : 'Test Table Name'에 있는 쿼리로 JDBC Connection Pool을 확인한다.
    4. Connection Reserve Timeout : The number of seconds (between -1 and a positive 32-bit integer) after
      which a call to reserve a connection from the pool will timeout.
      When set to 0, a call will never timeout.
      When set to -1, a call will timeout immediately.
    5. Connection Creation Retry Frequency : DB가 연결이 되지 않은 상태에서 시작할 수 있으며,
      정해진 간격으로 체크하면서 DB가 연결되면 Pool을 생성한다.
      300초면 적당할 듯하다.

Nostage -

WebLogic + Apache2 Tuning

WebLogic Debug

  1. vi setDomain.sh 이나 환경설정에서 MEM_ARGS 라인에 -verbosegc 옵션을 추가한다.
    #   MEM_ARGS="-Xms512m -Xmx512m" (기존)
    #   MEM_ARGS="-Xms512m -Xmx512m -verbosegc" (GC Memory Debug On)
    
 
:
Posted by 라면스프


[IBM Dump Analyzer] javacore 분석툴 jca 사용하기

jca 툴은 javacore 를 분석할 수 있는 툴입니다. 
덤프파일의 생성은 JVM이 죽을경우 코어 파일을 만들어지게 됩니다.
또는 사용자가 직접 kill -3 PID 명령어를 이용해 덤프 파일을 생성하시면 되겠죠.
이 툴은 ibm 에서 제공하구요. 참고로 heapdump 를 분석하는 툴로 HeapAnalyzer 가 있다고하네요.
이글은 툴 다운로드 부터 실행까지 입니다. 자세한건 사용하시면서 알아가시면 될듯합니다. ^^
코어 분석에 도움 참고 사이트로 J2EE 어플리케이션에서 Bottleneck의 발생과 대처 방법 가 있습니다.


jca 툴 다운로드 : http://www.alphaworks.ibm.com/tech/jca/download


다운로드시 로그인을 하셔야 합니다. ^^;  ibm ID가 없으시면 procees without an IBM ID 메뉴를 이용하시면 됩니다.


 asterisk (*)  체크된 부분만 입력하시고   I confirm 버튼 누르시면 됩니다.
참고로 View license 읽어보시구요. 한글도 지원하네요.

The fields indicated with an asterisk (*) are required to complete this transaction; other fields are optional. If you do not want to provide us with the required information, please use the "Back" button on your browser to return to the previous page, or close the window or browser session that is displaying this page.


jca31.zip 파일 다운로드가 완료 되시면 적당한 곳에 압축을 풀어주세요.

C:\jca31  전 여기에 풀었습니다.


툴 실행전에 사용자 환경에 자바가 설치 되어 있어야 합니다. ^^

경로 이동후 jar 파일을 실행 해주세요

java –Xmx300m –jar jca31.jar

경로 이동후 jar 파일을 실행 해주세요. 실행 때  -Xmx 옵션을 적용해서 메모리를 여유있게 주는것이 좋다고 하네요.


툴은 스윙으로 만들어져 있었습니다.

 Compre Threads 메뉴 이용해서 여러개의 javacore 파일을 비교 분석할 수도 있고


메모리상황 그리고 Thread의 Detail 한 정보까지 볼 수 있습니다.


참고로 readme31.zip 파일이 있습니다.

압축을 풀어보시면 readme.htm 파일이 있구요. 그걸 실행시키면

사용방법이 있습니다. 참고하시면 될듯합니다.   참고 : http://starplaying.tistory.com/81


:
Posted by 라면스프
2008. 11. 13. 21:00

IBM Thread and Monitor Dump Analyzer Enjoy/JAVA2008. 11. 13. 21:00


출처 : http://www.alphaworks.ibm.com/tech/jca
다운로드 : http://www.alphaworks.ibm.com/tech/jca/download

참고페이지 : http://starplaying.tistory.com/82

How to run IBM Thread and Monitor Dump Analyzer for Java

You need to use the Java 2 Platform, Standard Edition version 5.0 or higher Java Runtime Environment (JRE) to run IBM Thread and Monitor Dump Analyzer for Java.

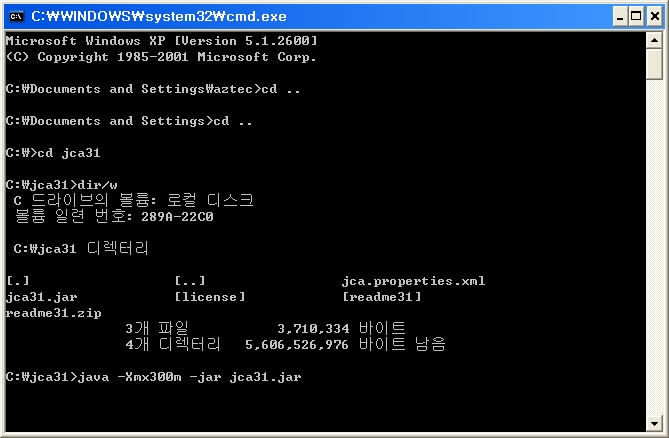
Usage <Java path>java –Xmx[heapsize] –jar jca<Thread and Monitor Dump Analyzer for Java version>.jar [javacore files separated by path delimiter] [analysis output HTML file]


For example,

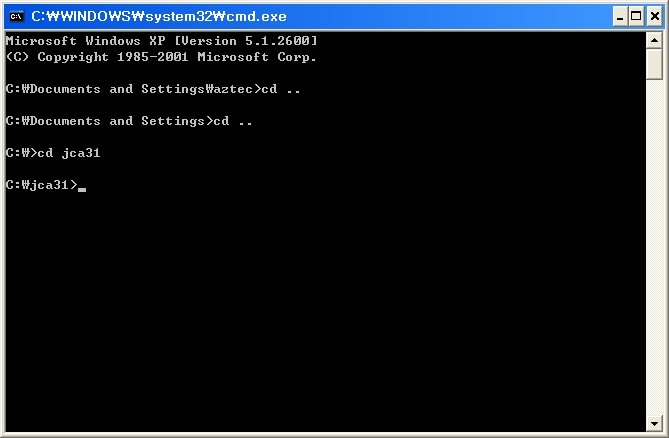
C:\java\bin\java –Xmx200m –jar jca13.jar

=> Starts IBM Thread and Monitor Dump Analyzer for Java version 1.3 and open javacore files from menu.


/usr/java/bin/java –Xmx200m –jar /usr/jca/jca13.jar /usr/javacore.20060228.171037.2084.txt;/usr/javacore.20060228.171048.2084.txt

=> Starts IBM Thread and Monitor Dump Analyzer for Java version 1.3 with /usr/javacore.20060228.171037.2084.txt and /usr/javacore.20060228.171048.2084.txt


java –Xmx500m –jar jca13.jar  /usr/javacore.20060228.171037.2084.txt;/usr/javacore.20060228.171048.2084.txt output.html (On Windows system)

=> Starts IBM Thread and Monitor Dump Analyzer for Java with /usr/javacore.20060228.171037.2084.txt and /usr/javacore.20060228.171048.2084.txt and generates analysis output in output.html without invoking graphical user interface


WARNING: If the analysis output HTML file exists, the tool will overwrite the file.


If there’s java.lang.OutOfMemoryError while you are processing Javacore files, please try increasing the maximum heap size (-Xmx) value to give the JVM more memory.

Maximum heap size should not be larger than the size of available physical memory size for this tool due to performance issue.


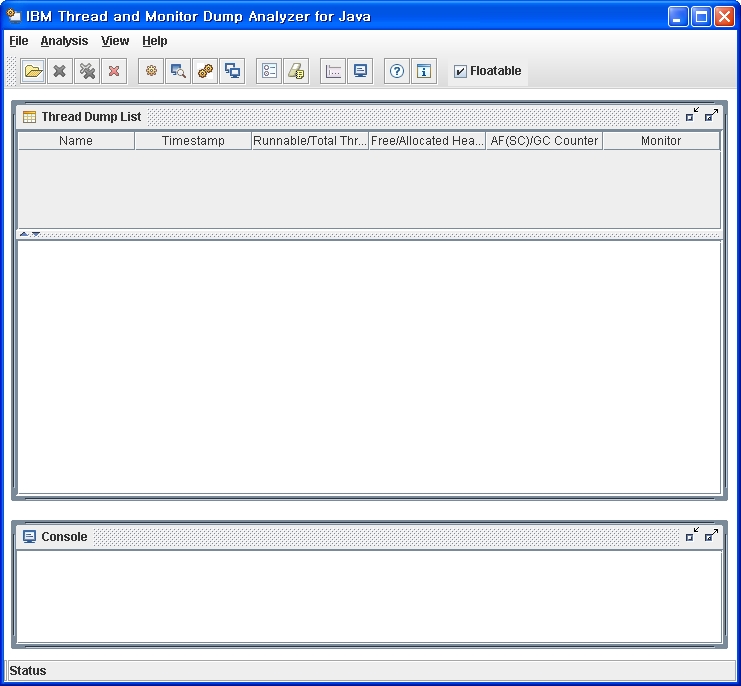
1. Start IBM Thread and Monitor Dump Analyzer for Java


The following screen is a snapshot of the initial screen.


2. Select File-> Open Thread Dumps to open Javacore files if you didn’t specify Javacore files in the command line during the startup.


3. You can select multiple Javacore files


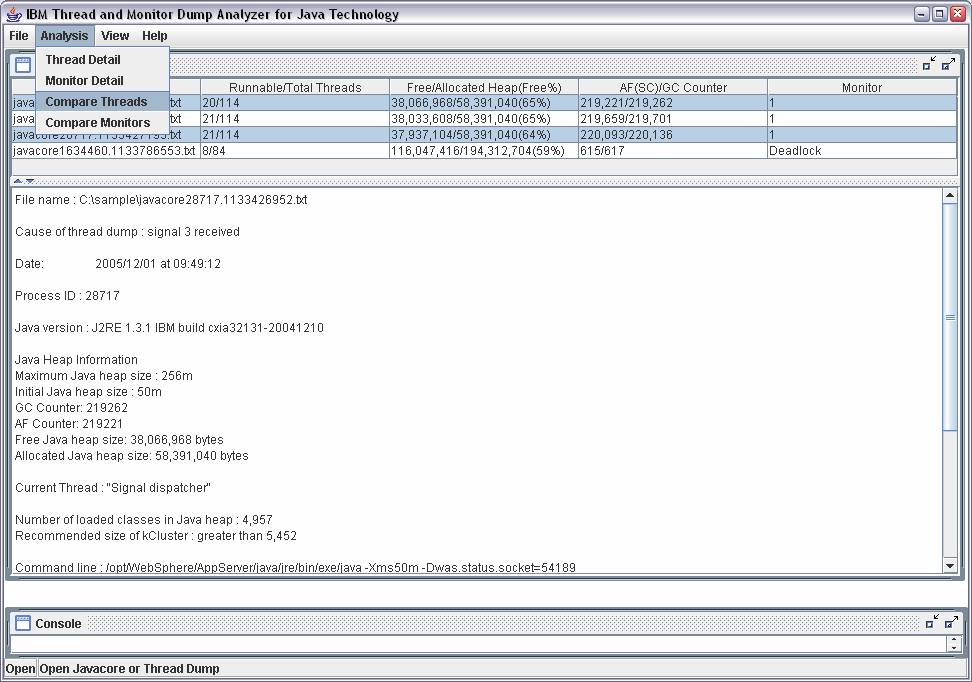
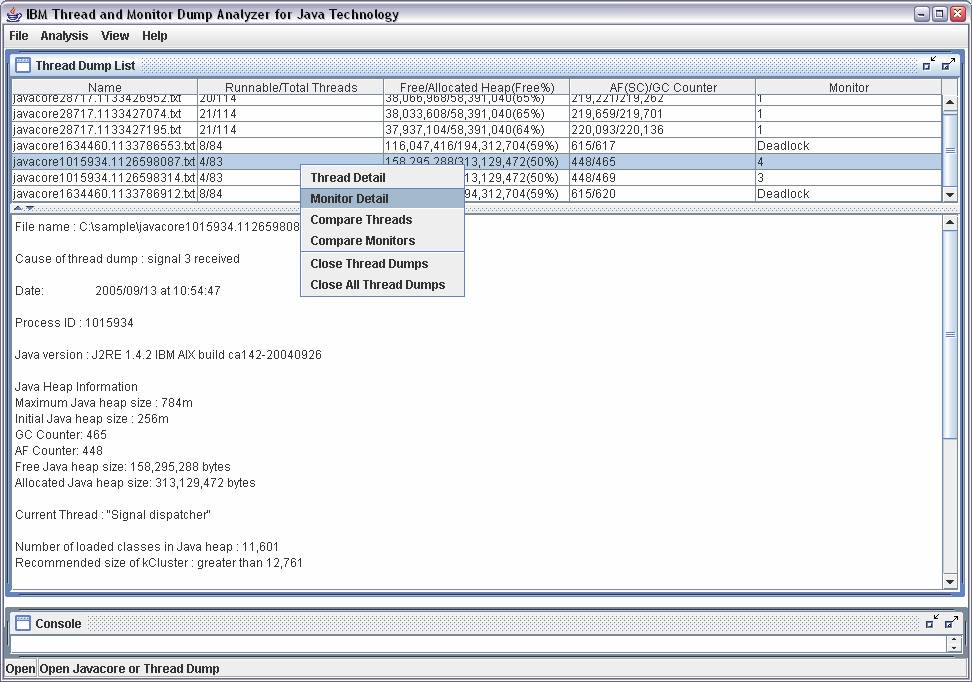
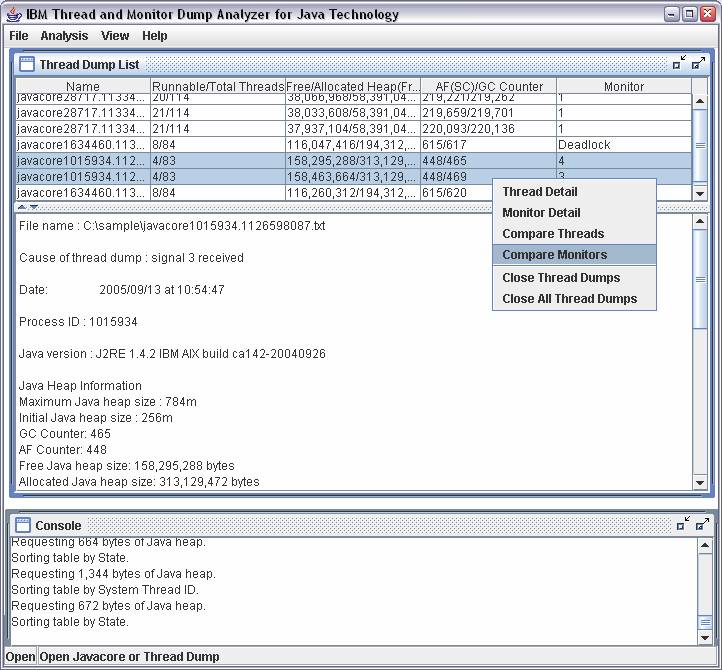
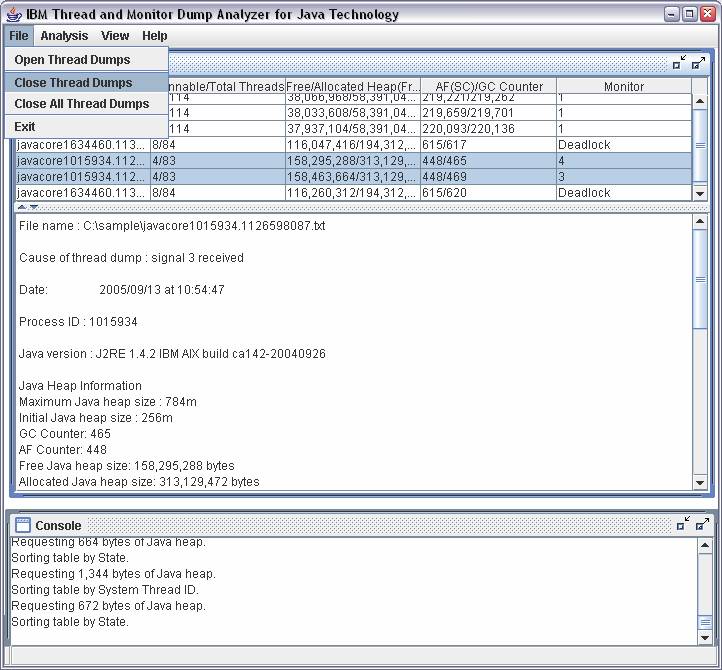
4. Loaded Javacore files are listed in the Thread Dump List table.


Thread Dump List provides the following information:

  • Name: The file name of Javacore
  • Runnable/Total Threads : Number of runnable and total threads
  • Free/Allocated Heap : Amount of free and allocated Java heap
  • AF/GC Counter: Allocation Failure and Garbage Collector counter
  • Monitor : Number of Monitors locked. Deadlock is displayed if there’s any deadlock in Monitor


5. Click on a Javacore to display summary of the Javacore.


The following information is displayed for IBM Javacore:


  • File name
  • Cause of thread dump
  • Date
  • Process ID
  • Java version
  • Java Heap Information
    • Maximum Java heap size
    • Initial Java heap size
    • Garbage Collector Counter
    • Allocation Failure Counter
    • Free Java heap size
    • Allocated Java heap size
  • Current Thread Name
  • Number of loaded classes in Java heap
  • Recommended size of kCluster (Only applicable to IBM SDK 1.4.2 and 1.3.1 SR7 or later)
  • Java Command line


Non-IBM Javacore ( or thread dump ) provides limited information.


6. Click on Right Button of your mouse to bring up a menu.Or click on Analysis menu to display sub menu


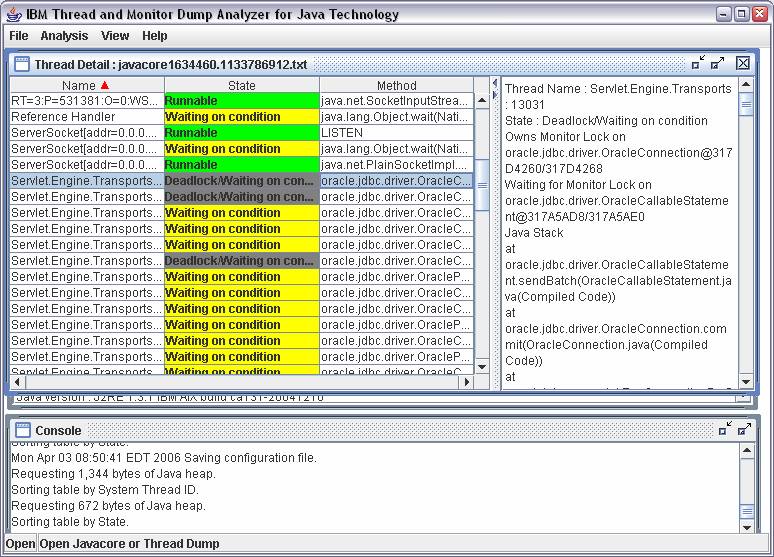
7. The following is Thread Detail View of a Javacore:


Threads are sorted by thread name. Thread Detail View provides the following information:


  • Thread Name : The name of a thread
  • Thread State : The state of a thread for example, Runnable, Waiting or Suspended
  • Method Name : The latest method invoked or predefined status or stack trace pattern for example, IDLE, LISTEN and KEEP-ALIVE
  • Java Stack Trace : Java Stack Trace is shown when a thread is selected.
  • Native Stack Trace : Native Stack Trace is shown below Java Stack Trace if it’s available


NOTE:

  • An IDLE thread is a thread that is ready to receive work but does not have a connection established.
  • A KEEP-ALIVE thread is an idle thread that is ready to receive work and does have a connection established.
  • A LISTEN thread listens on a port


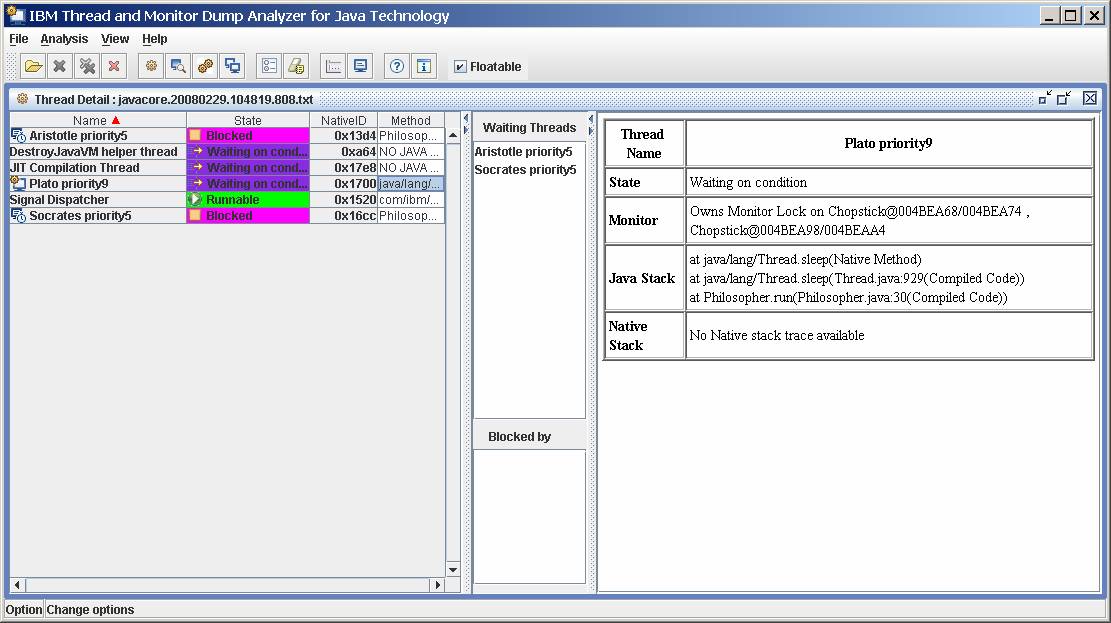
8.If  a thread owns monitors, thread name is marked with a special icon and threads that are waiting for monitor lock are displayed.

In the following example, the thread,Plato priority9, has monitor ownership icon. In waiting threads list, Aristotle and Socrates threads are displayed.


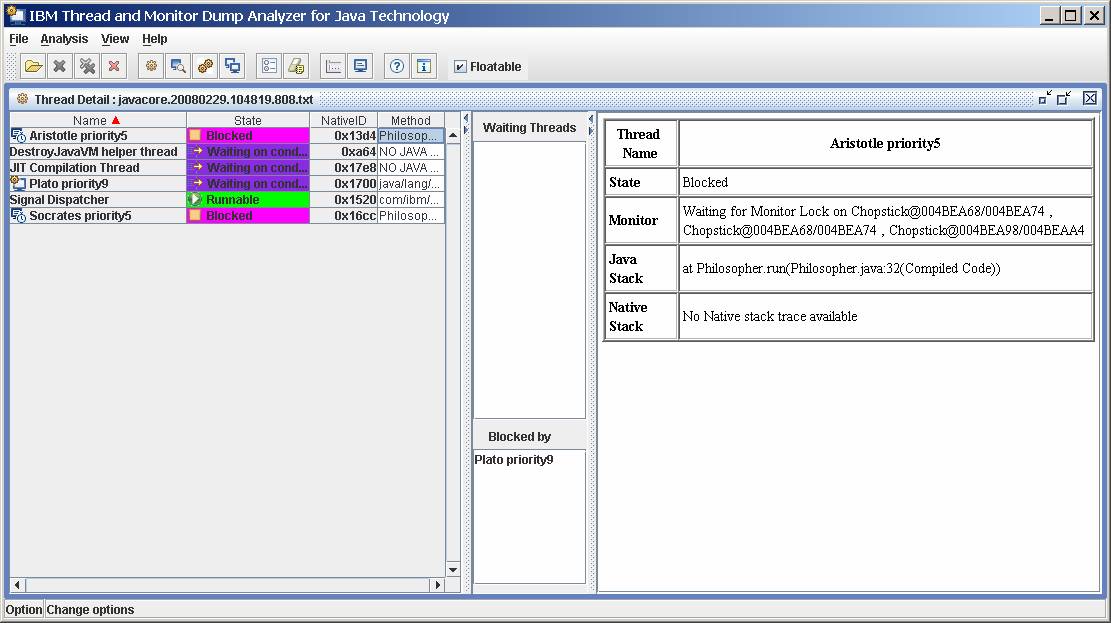
If a thread is waiting for monitor lock, thread name is marked with a special icon and thread that owns monitor lock is displayed.

In the following example, the thread,Aristotle priority5, has waiting for monitor lock icon in name column.

In Blocked by list, Plato priority9 which owns the monitor is displayed:


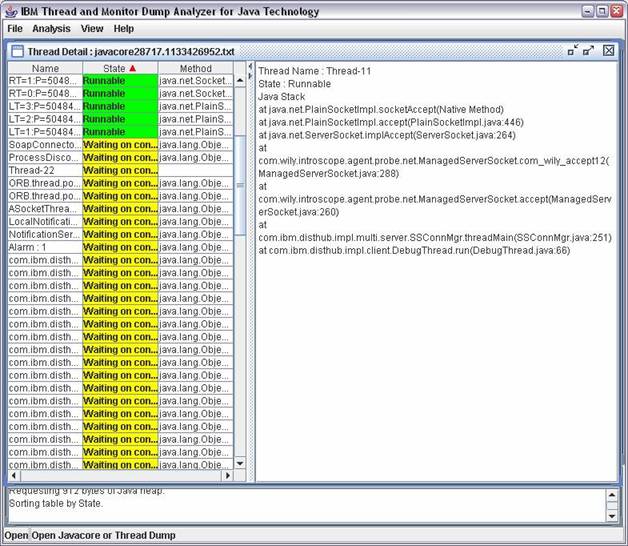
9. You can sort any column by clicking on table header. The following is Thread Detail View sorted by thread state


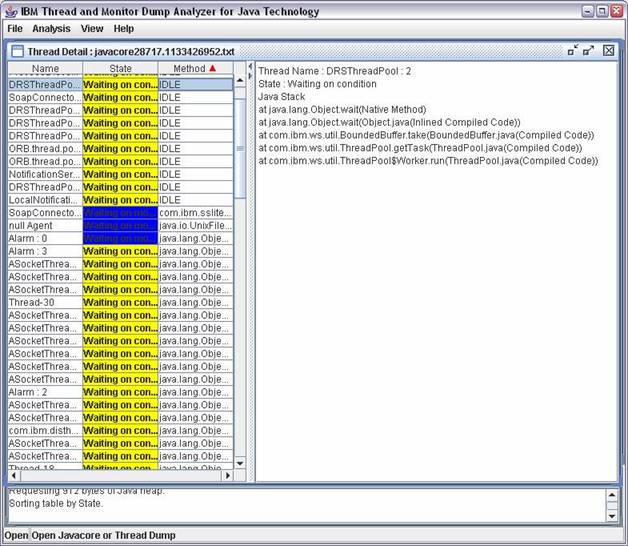
10. The following is Thread Detail View sorted by method.


11.Deadlock threads are shown in gray by default as follows:


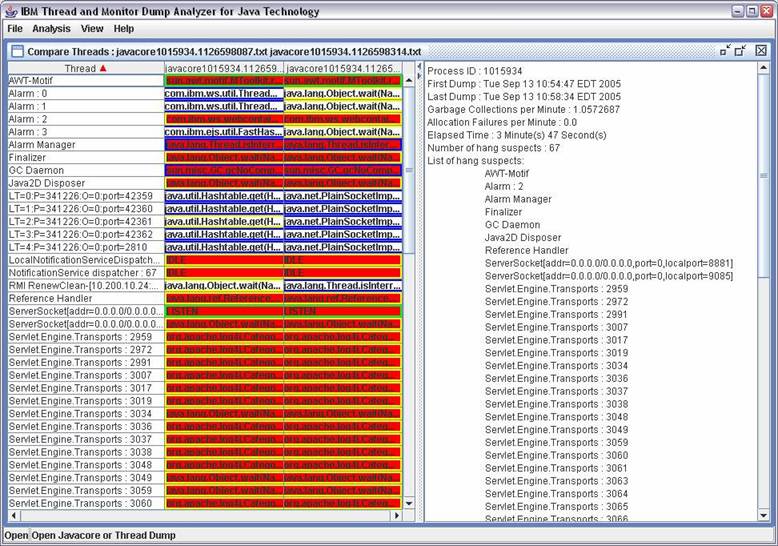
12. Select multiple Javacore by holding Ctrl key and click on right button of your mouse and select Compare Threads

 Or select Analysis -> Compare Threads to display Compre Threads View


13.  The following is Compre Threads View of two Javacore.


Summary is displayed in the right pane. Thread name and method name are displayed from each Javacore on the table.


  • Process ID
  • First Dump : Timestamp of the first Javacore
  • Last Dump : Timestamp of the last  Javacore
  • Garbage Collections per Minute :  Number of Garbage Collections per minute
  • Allocation Failures per Minute : Number of Allocation Failures per minute
  • Elapsed Time : Time between the first Javacore and the last Javacore
  • Number of hang suspects
  • List of hang suspects


Red background indicates there’s possible hang in the thread. Green border indicates runnable thread. Blue border indicates waiting on monitor. Yellow border indicates waiting on condition.


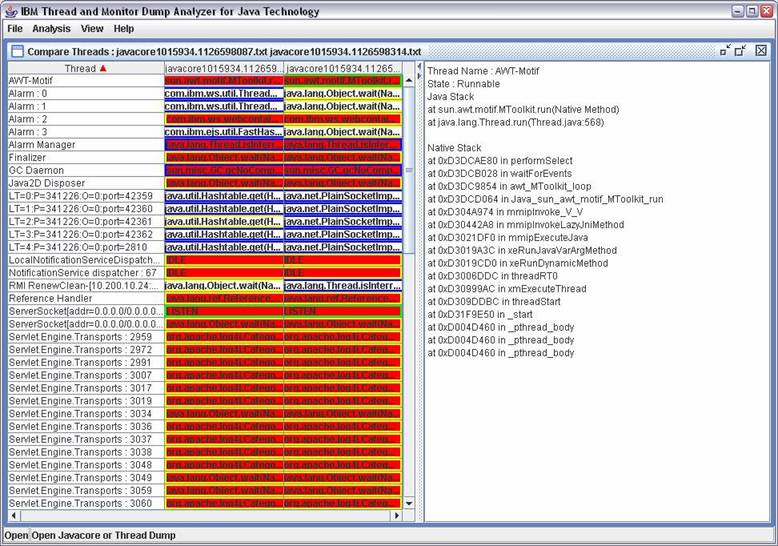
14. Thread summary is displayed when a thread is selected.


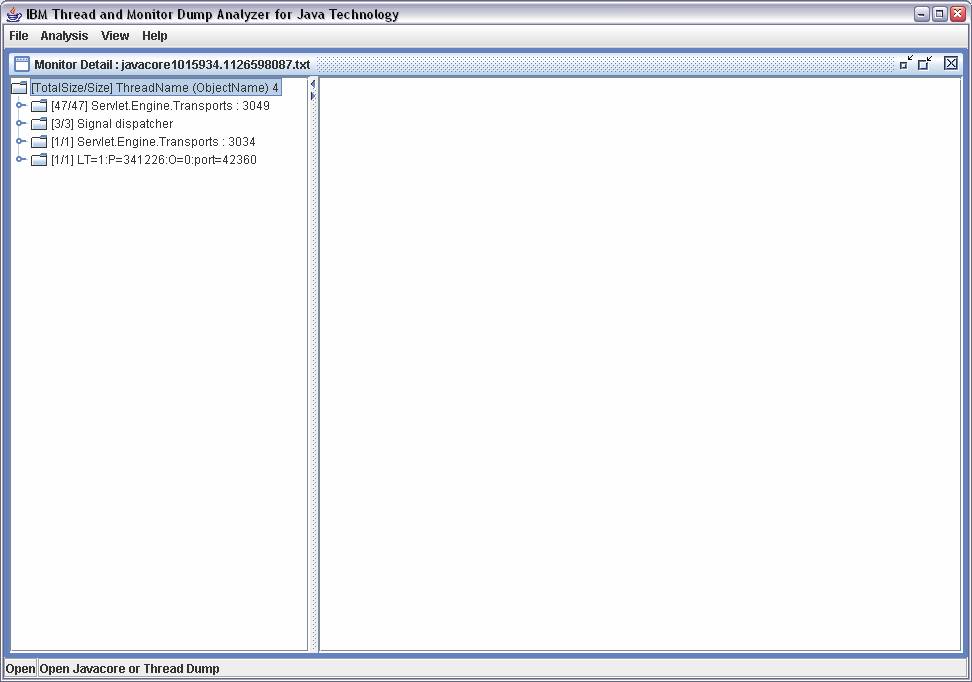
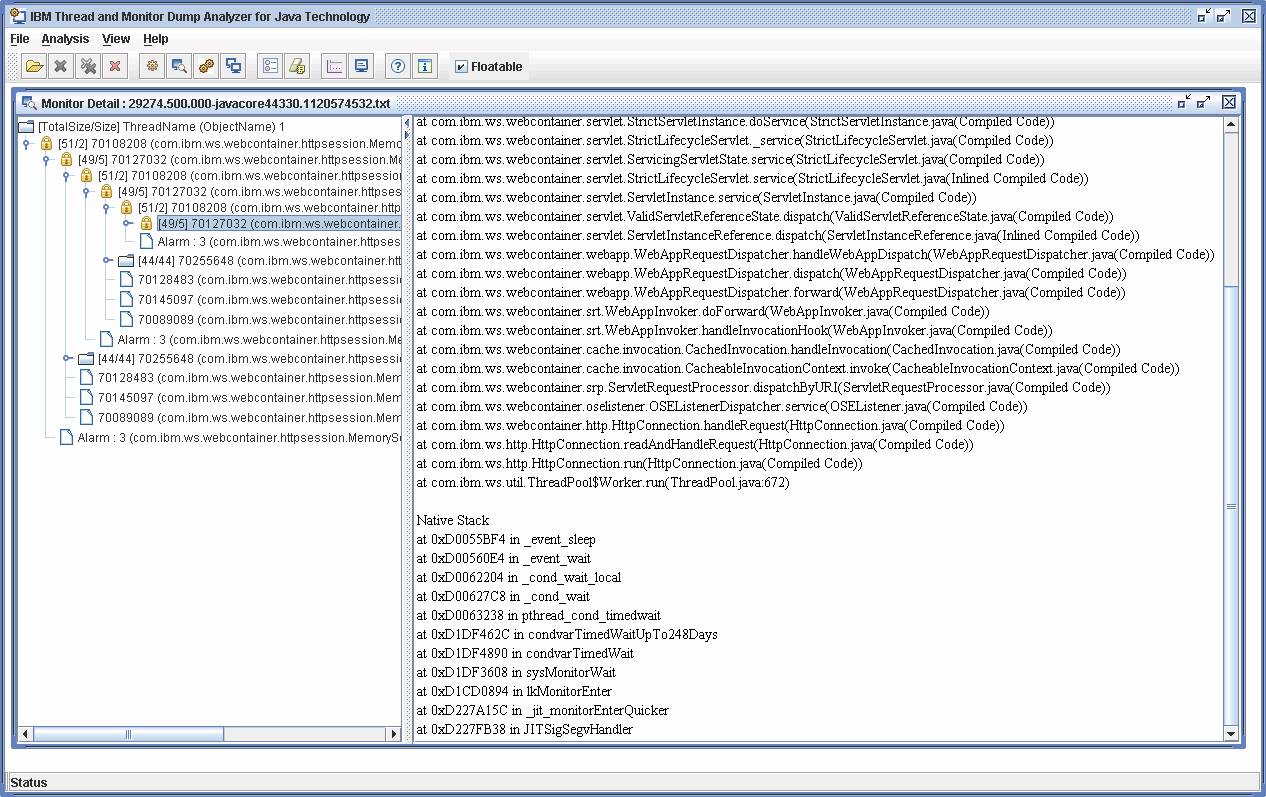
15. Select Monitor Detail to display Monitor Detail View


16.    Monitor lock information is displayed in tree format


Total Size is total number of threads directly and indirectly related with a specific monitor.

Size is number of threads directly related with a specific monitor.


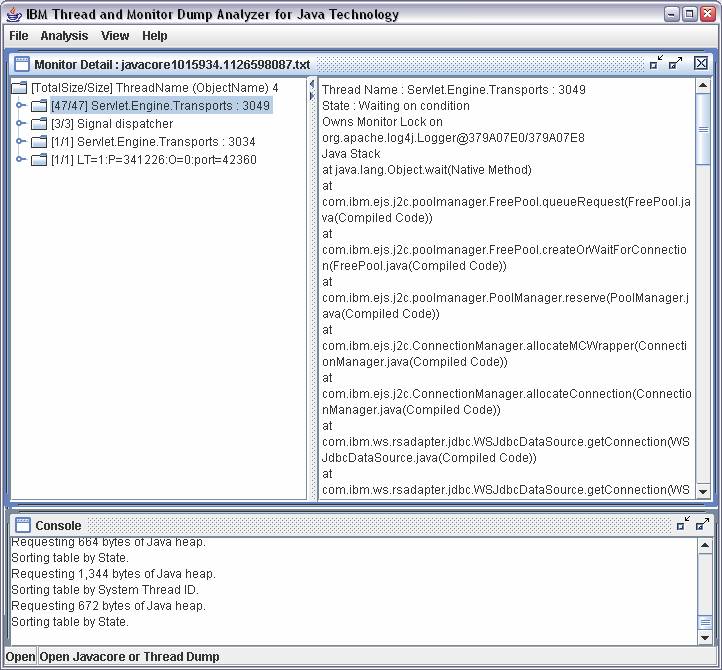
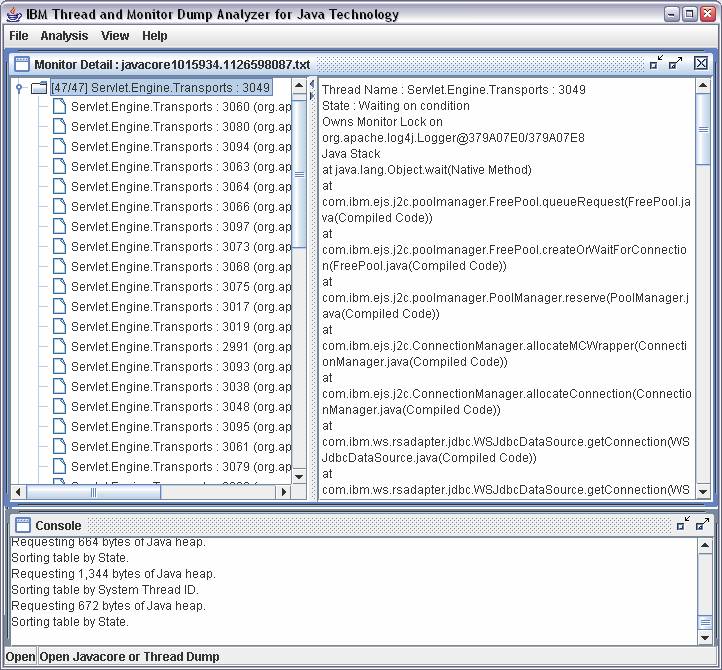
Click on one of the threads.


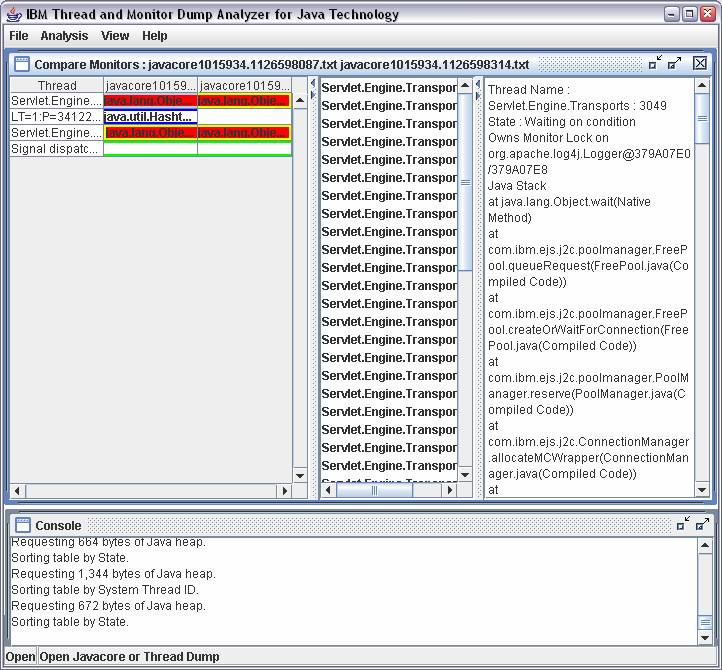
There are 47 threads waiting for the monitor which is locked by Servlet Engine Transports : 3049


Deadlock threads are displayed with the icon,

as follows:


17. You can click on any thread to display detailed information about monitor and thread information


18. You can also compare Monitor in Compare Monitor View. Select Compare Monitors Menu


19. Red line indicates there’s possible hang in a specific thread in Compare Monitors View.


If you click on a thread, list of threads waiting for the locks that the thread owns is displayed in the middle pane. If you click on any thread in the middle pane, thread information is displayed on the right pane.


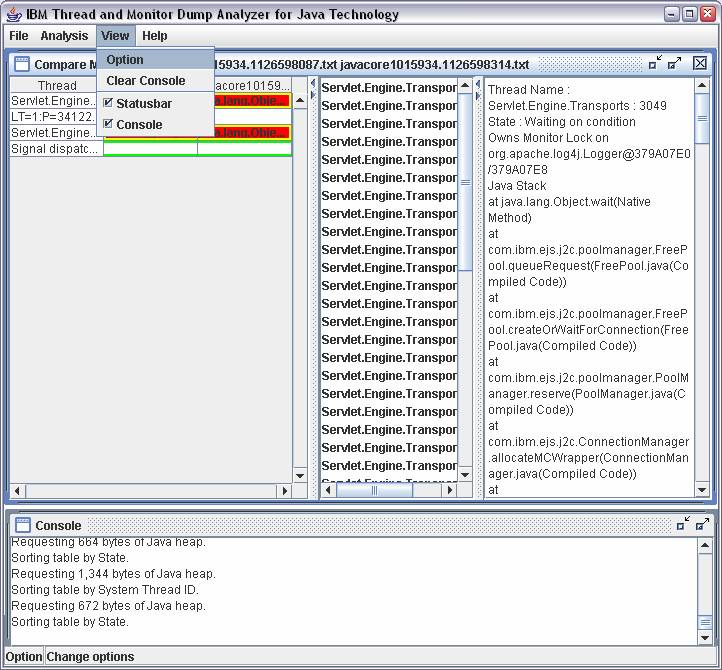
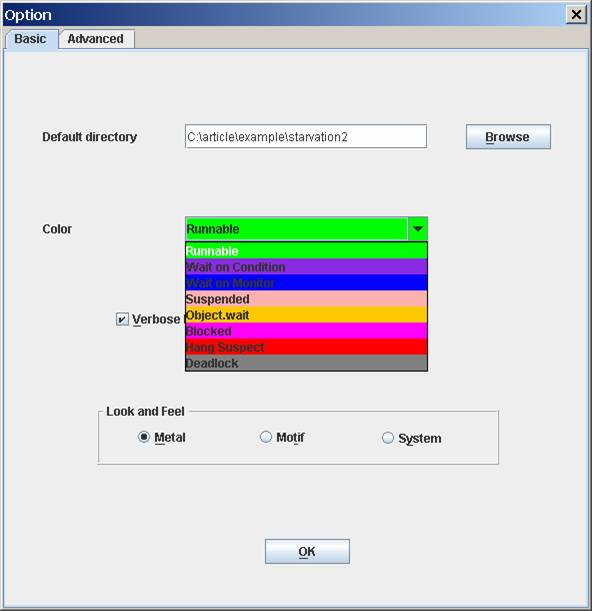
20. Select View-> Option to configure IBM Thread and Monitor Dump Analyzer for Java.


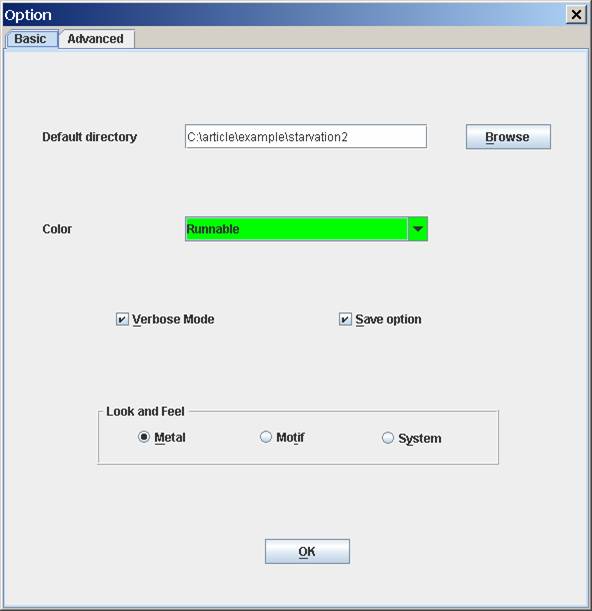
21. You can change default directory, color and other options.


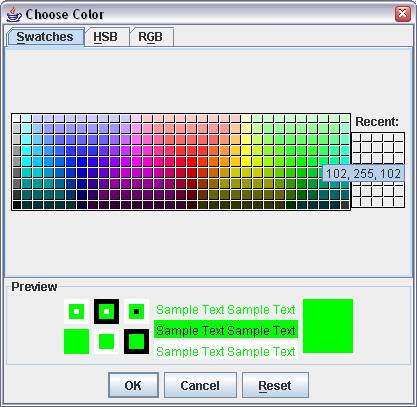
22-1. Select a state in Color and click on Change button to change color.


22-2. Select a color and click on OK


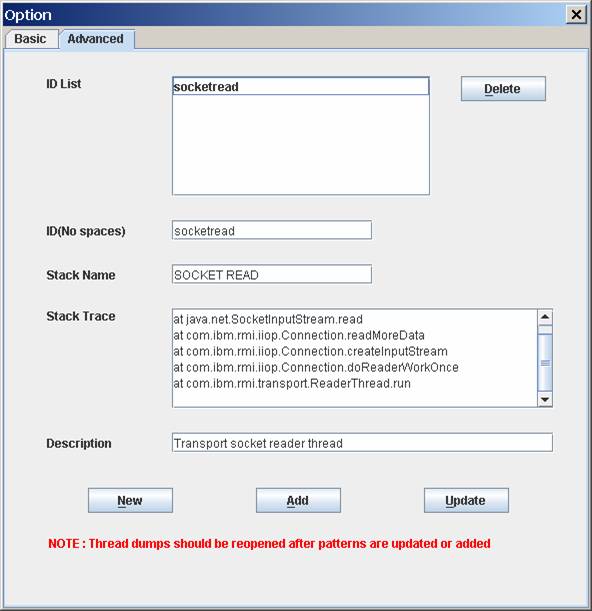
23.In Advanced pane of option , you can customize stack trace pattern recognition engine:


·        ID List : ID list of customized stack trace pattern

·        ID : Identifier of stack trace pattern. No spaces allowed.

·        Stack Name : Stack trace pattern name that is seen from Thread Detail View

·        Stack Trace : Stack trace pattern. Syntax : “at package.class.method”.   No parenthesis allowed.

·        Description : description of a stack trace pattern

·        The tool will search for stack trace pattern and display Stack Name in Thread Detail View if any matching is found

·        WARNING : Please reopen thread dumps if new stack trace patterns are added if thread dumps are already loaded.


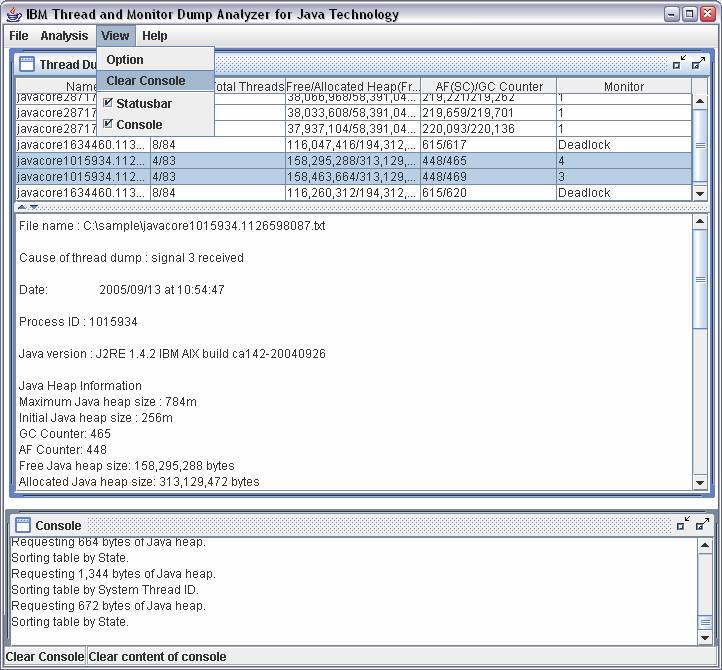
24. You can delete message in console by selecting Clear Console Menu


25. Select Close Thread Dumps to unload Javacore files.


26. Help menu displays help screen.


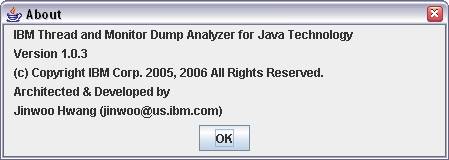
27. Select Help->About to display version information of IBM Thread and Monitor Dump Analyzer for Java


Copyrights and Notices


(C) Copyright IBM Corporation 2005-2008. All Rights Reserved. Note to U.S. Government Users Restricted Rights -- Use, duplication or disclosure restricted by GSA ADP Schedule Contract with IBM Corp.


AIX, Cloudscape, DB2, IBM, iSeries, OS/390, WebSphere, and z/OS are trademarks or registered trademarks of IBM Corporation in the United States and/or other countries.


Java and all Java-based trademarks and logos are trademarks of Sun Microsystems, Inc. in the United States and/or other countries.


Microsoft, Windows, and Windows NT are trademarks of Microsoft Corporation in the United States and/or other countries.


UNIX is a registered trademark of The Open Group.


Other company, product, and service names may be trademarks or service marks of others.


The following paragraph does not apply to the United Kingdom or any other country where such provisions are inconsistent with local law:


INTERNATIONAL BUSINESS MACHINES CORPORATION PROVIDES THIS TOOLS "AS IS" WITHOUT WARRANTY OF ANY KIND, EITHER EXPRESS OR IMPLIED, INCLUDING, BUT NOT LIMITED TO, THE IMPLIED WARRANTIES OR CONDITIONS OF NON-INFRINGEMENT, MERCHANTABILITY OR FITNESS FOR A PARTICULAR PURPOSE. Some states do not allow disclaimer of express or implied warranties in certain transactions, therefore, this statement may not apply to you. This information could include technical inaccuracies or typographical errors. Changes are periodically made to the information herein; these changes will be incorporated in new editions of the tool. IBM may make improvements and/or changes in the product(s) and/or the program(s) described in this tools at any time without notices.


참고페이지 : http://starplaying.tistory.com/82

:
Posted by 라면스프
2008. 11. 13. 19:57

Memory Leak Enjoy/JAVA2008. 11. 13. 19:57

출처 : http://wiki.ex-em.com/index.php/Memory_Leak#Memory_Leak.EA.B3.BC_Out_Of_Memory_Error


Memory Leak

EXEM Knowledge Base

Jump to: navigation, 찾기

목차

[숨기기]

[편집] Memory Leak의 개요

엄밀하게 말하면 Java에서는 C/C++에서와 같은 Memory Leak이 존재하지 않는다. 적어도 JVM의 규약(Specification)상으로는 그렇다. Java에서는 한번 사용된 후 더 이상 사용되지 않는 객체, 즉 더 이상 참조(Reference)되지 않는 객체는 Garbage Collector에 의해 자동으로 정리된다. 따라서 Memory Leak이 발생할 수 없다.

Java에서의 Memory Leak은 더 정확하게 말하면 Unintentional Object Retention, 즉 [의도하지 않은 오브젝트의 계속 보유]를 의미한다. 오브젝트를 생성한 후 참조 관계를 정리하지 못한 경우, Garbage Collector는 해당 오브젝트가 사용될 가능성이 있는지 없는지를 판단할 수 없기 때문에 메모리 해제 작업을 수행할 수 없다. 이런 오브젝트들 해제되지 않고 계속 상주하면 Java Heap이 불필요한 오브젝트들로 꽉 차게 되고 Out Of Memory Error가 발생하게 된다. 즉, Java에서의 Memory Leak은 Unintentional Object Retention에 의한 Out Of Memory Error의 발생으로 요약 정리할 수 있다.

[편집] Memory Leak과 Out Of Memory Error

Memory Leak이 있는 경우에는 메모리 공간이 점진적으로 불필요한 객체들로 가득차게 되며, 필연적으로 Out Of Memory Error가 발생한다. 따라서 Out Of Memory Error가 발생하면 우선 메모리 공간의 크기를 검증하고, 다음으로 Memory Leak의 발생 가능성을 검토해 보아야 한다.

불행하게도 Memory Leak이 발생하는 장소를 정확하게 찾아내는 것은 어려운 경우가 많다. 필요한 경우 HProf와 같은 기본적인 ProfilerJProfiler, JProbe 등과 같은 Profiler를 통해서 메모리 분석을 수행해야 한다.

[편집] Memory Leak과 성능

Memory Leak이 단지 OOME만을 일으키는 것은 아니다. Memory Leak이 발생하면 Java Heap 공간의 여유 공간이 잘 확보되지 않기 때문에 계속적인 Garbage Collection이 발생한다. 불행 중 다행으로 OOME가 발생하지 않더라도 계속적인 GC 작업에 의해 성능이 저하된다. 따라서 GC Dump를 분석할 때 Memory Leak의 발생 가능성이 있는지 검토해야 한다.

[편집] Memory Leak 검증 툴

다음과 같은 툴들을 통해서 Memory Leak 현상을 분석하고 검증할 수 있다.

  1. GC Dump
  2. HProf
  3. HAT
  4. HA
  5. VisualVM
:
Posted by 라면스프
2008. 11. 13. 19:55

GC Dump 보기 Enjoy/JAVA2008. 11. 13. 19:55

출처 : http://wiki.ex-em.com/index.php/GC_Dump


GC Dump

EXEM Knowledge Base

Jump to: navigation, 찾기

목차

[숨기기]

[편집] 개요

GC Dump는 JVM의 Heap 사용 현황을 파악하는 가장 기본적인 도구이다. GC Dump를 이용하면 다음과 같은 정보를 얻을 수 있다.

  • GC 발생 시간
  • GC 수행 소요 시간
  • GC 발생 당시 Heap Usage

GC Dump는 시스템에 부하는 부하가 작기 때문에 운영 시스템에서 GC Dump를 남기는 옵션을 켜둘 것을 권장한다. 만일 메모리 문제가 발생했을 경우 GC Dump만으로 정보가 부족할 경우에는 Heap Dump를 이용해서 추가적인 분석을 수행할 수 있다. 단, Heap Dump는 시스템에 상당한 부하를 줄 수 있기 때문에 꼭 필요한 경우에만 사용해야 한다.

[편집] Sun Hotspot JVM

Sun Hotspot JVM에서는 다음과 같은 옵션들을 이용해서 GC Dump를 제어한다.

  • PrintGCDetails : GC 수행 상세 정보를 출력한다.
  • PrintGCTimeStamps : GC 발생 시간 정보를 출력한다.
  • PrintHeapAtGC : GC 발생시 Heap 상세 정보를 출력한다.
  • -Xloggc:<file>: GC Dump를 저장할 파일명을 지정한다. 따로 지정하지 않으면 Console에 바로 출력된다.


[편집] 기본 포맷

GC Dump의 출력 결과는 기본적으로 다음과 같은 포맷을 지닌다.

  • 시간(JVM 시작이후의 시간)
  • Generation이름(DefNew+Tenured, PSYoungGen+PSOldGen, ParNew+CMS-concurrent-mark)
  • Heap Usage 변동: {GC전 Usage} -> {GC후 Usage}({Total Size})
    • 예를 들어 896K->64K(960K) 이면 GC 전에는 896K를 사용했으며, GC 후 64K로 사용량이 줄었으며, 전체 크기는 960K라는 의미이다.
  • GC 소요 시간: GC를 수행하는데 걸린 시간

아래 간단한 예제가 있다.

0.186: [GC 0.186: [DefNew: 896K->64K(960K), 0.0022028 secs] 896K->434K(5056K), 0.0023143 secs]

위의 예제가 의미하는 바는 다음과 같다.

  • JVM 구동후 0.186 초에 수행된 GC 작업이다.
  • DefNew는 Default Serial Collector에서의 Young Generation을 의미한다. 즉 Minor GC가 수행되었다.
  • Young Generation의 크기는 960K이며, 896K를 사용 중이었고, GC 작업에 의해 64K만을 사용하게 되었다. 즉, GC에 의해 832K(896-64)가 Collection 되었다.
  • Minor GC 작업에 0.0022028 초가 소요되었다.
  • 전체 Heap 크기는 5056K이며, Minor GC에 의해 사용량이 896K에서 434K로 줄어들었다.
  • Minor GC를 포함해 GC를 수행하는데 총 소요된 시간은 0.0023143 초이다.

[편집] Collector 종류별 포맷

[편집] Serial Collector

Serial CollectorUseSerialGC 옵션을 이용해 활성화된다. Serial CollectorYoung GenerationOld Generation 정리 작업에 모두 Serial 방식, 즉 하나의 Thread(Single Thread)를 사용해서 GC 작업을 수행한다. Serial Collector에 의한 GC Dump에는 다음과 같은 세 가지 종류의 로그가 기록된다.

-- Minor GC
0.186: [GC 0.186: [DefNew: 896K->64K(960K), 0.0022028 secs] 896K->434K(5056K), 0.0023143 secs]
-- Major GC (Promotion Failure 발생)
1.388: [GC 1.388: [DefNew: 3839K->383K(3840K), 0.0064941 secs]
 1.394: [Tenured: 50563K->49784K(50592K), 0.1538941 secs] 53367K->49784K(54432K), 0.1605942 secs]
-- Full GC
2.425: [Full GC 2.425: [Tenured: 60543K->60543K(60544K), 0.1595010 secs] 65087K->64787K(65088K), 
 [Perm : 391K->391K(12288K)], 0.1596044 secs]

Serial Collector에서의 GC Dump의 전체 샘플은 Serial Collector GC Log Sample을 참조한다.

[편집] Parallel Collector

Parallel CollectorUseParallelGC 옵션을 이용해 활성화된다. Parallel CollectorYoung Generation 정리 작업에 Parallel 방식, 즉 여러 개의 Thread를 사용한다. Enterprise 급의 대형 Application에서는 매우 큰 크기의 Young Generation을 사용하게 된다. 이 경우 Minor GC에 많은 시간이 걸릴 수 있다. Parallel CollectorMinor GC 작업에 Multi Thread를 사용함으로써 Minor GC에 의한 Pause Time을 최소화한다. UseParallelOldGC 옵션을 이용하면 Old Generation에 대해서도 Parallel 방식을 사용할 수 있다.
Parallel Collector에 의한 GC Dump에는 다음과 같은 종류의 로그가 기록된다.

-- Minor GC
0.893: [GC [PSYoungGen: 28023K->10311K(25728K)] 49157K->38181K(56000K), 0.0556451 secs]
-- Full GC
1.460: [Full GC [PSYoungGen: 4032K->0K(26880K)] [PSOldGen: 49402K->51007K(66752K)] 53434K->51007K(93632K) 
 [PSPermGen: 2003K->2003K(12288K)], 0.1678135 secs]

Parallel Collector에서의 GC Dump의 전체 샘플은 Parallel Collector GC Log Sample을 참조한다.

[편집] CMS Collector

CMS CollectorUseConcMarkSweepGC 옵션에 의해 활성화된다. CMS CollectorFull GC에 의한 Pause Time을 최소화하기 위해 Old Generation에 대한 정리 작업을 Concurrent 방식으로 진행한다. CMS Collector에 의한 GC Dump에는 다음과 같은 종류의 로그가 기록된다.

-- Minor GC
0.138: [GC 0.138: [ParNew: 26240K->3264K(29504K), 0.0503947 secs] 26240K->8241K(521024K), 0.0505461 secs]
-- Concurrent GC
2.593: [GC [1 CMS-initial-mark: 259838K(491520K)] 263365K(521024K), 0.0023419 secs]
2.596: [CMS-concurrent-mark-start]
4.357: [CMS-concurrent-mark: 0.655/1.761 secs]
4.357: [CMS-concurrent-preclean-start]
4.419: [CMS-concurrent-preclean: 0.040/0.062 secs]
4.419: [CMS-concurrent-abortable-preclean-start]
4.428: [CMS-concurrent-abortable-preclean: 0.007/0.010 secs
4.588: [GC[YG occupancy: 3619 K (29504 K)]4.588: [Rescan (parallel) , 0.0148329 secs]4.603: [weak refs processing, 0.0000291 secs] [1 CMS-remark: 422939K(491520K)] 426559K(521024K), 0.0149645 secs]
4.688: [CMS-concurrent-sweep-start]
5.425: [CMS-concurrent-sweep: 0.302/0.737 secs]
5.425: [CMS-concurrent-reset-start]
5.489: [CMS-concurrent-reset: 0.014/0.064 secs]

CMS Collector에서의 GC Dump의 전체 샘플은 CMS Collector GC Log Sample을 참조한다.


[편집] Memory Leak과 GC Dump

Memory Leak이 발생한 경우 GC Dump은 다음과 같은 전형적인 패턴을 보인다.

1.564: [GC 1.564: [DefNew: 4543K->447K(4544K), 0.0074507 secs] 55108K->52239K(65088K), 0.0075322 secs]
1.576: [GC 1.576: [DefNew: 4543K->447K(4544K), 0.0084435 secs] 56335K->54675K(65088K), 0.0085257 secs]
1.589: [GC 1.589: [DefNew: 4543K->447K(4544K), 0.0072420 secs] 58771K->55902K(65088K), 0.0073378 secs]
1.600: [GC 1.600: [DefNew: 4543K->447K(4544K), 0.0073699 secs] 59998K->57130K(65088K), 0.0074590 secs]
1.610: [GC 1.610: [DefNew: 4543K->447K(4544K), 0.0075529 secs] 61226K->58357K(65088K), 0.0076395 secs]
1.621: [GC 1.621: [DefNew: 4543K->447K(4544K), 0.0074387 secs] 62453K->59585K(65088K), 0.0075247 secs]
1.632: [GC 1.632: [DefNew: 4543K->4543K(4544K), 0.0000433 secs] 63681K->63681K(65088K), 0.0001028 secs]
1.632: [Full GC 1.632: [Tenured: 59137K->57835K(60544K), 0.2154176 secs] 63681K->57835K(65088K), [Perm : 392K->391K(12288K)], 0.2155249 secs]
1.851: [GC 1.851: [DefNew: 4096K->447K(4544K), 0.0057781 secs] 61931K->59063K(65088K), 0.0058661 secs]
1.860: [GC 1.860: [DefNew: 4543K->447K(4544K), 0.0071495 secs] 63159K->60291K(65088K), 0.0072347 secs]
1.870: [GC 1.871: [DefNew: 4543K->4543K(4544K), 0.0000335 secs]1.871: [Tenured: 59843K->60543K(60544K), 0.1666050 secs] 64387K->61519K(65088K), 0.1667678 secs]
2.038: [Full GC 2.038: [Tenured: 60543K->60543K(60544K), 0.1665533 secs] 62712K->61855K(65088K), [Perm : 391K->391K(12288K)], 0.1666667 secs]
2.234: [Full GC 2.234: [Tenured: 60543K->60543K(60544K), 0.1607975 secs] 65087K->64658K(65088K), [Perm : 391K->391K(12288K)], 0.1609087 secs]
2.425: [Full GC 2.425: [Tenured: 60543K->60543K(60544K), 0.1595010 secs] 65087K->64787K(65088K), [Perm : 391K->391K(12288K)], 0.1596044 secs]

위의 패턴은 다음과 같이 해석할 수 있다.

[편집] IBM JVM

IBM JVM에서는 다음 옵션들을 이용해서 GC Dump를 제어한다.

  • verbosegc : GC Dump를 남길 것을 지정한다. (예: -verbosegc)
  • verbosegclog : GC Dump를 남길 File 이름을 지정한다. (예: -Xverbosegclog:gc.log)

IBM JVM은 Sun Hotspot JVM과는 달리 XML 포맷의 로그를 남긴다. 일반적인 포맷(Generational Collection을 사용하지 않는 경우)은 다음과 같다.

<af type="tenured" id="1" timestamp="Tue Oct 23 00:33:18 2007" intervalms="0.000">
  <minimum requested_bytes="32" />
  <time exclusiveaccessms="0.037" />
  <tenured freebytes="209408" totalbytes="4194304" percent="4" >
    <soa freebytes="0" totalbytes="3984896" percent="0" />
    <loa freebytes="209408" totalbytes="209408" percent="100" />
  </tenured>
  <gc type="global" id="1" totalid="1" intervalms="0.000">
    <expansion type="tenured" amount="1048576" newsize="5242880" timetaken="0.010" reason="insufficient free space following gc" />
    <refs_cleared soft="6" weak="8" phantom="0" />
    <finalization objectsqueued="9" />
    <timesms mark="5.154" sweep="0.138" compact="0.000" total="5.405" />
    <tenured freebytes="1696464" totalbytes="5242880" percent="32" >
      <soa freebytes="1520336" totalbytes="5066752" percent="30" />
      <loa freebytes="176128" totalbytes="176128" percent="100" />
    </tenured>
  </gc>
  <tenured freebytes="1695728" totalbytes="5242880" percent="32" >
    <soa freebytes="1519600" totalbytes="5066752" percent="29" />
    <loa freebytes="176128" totalbytes="176128" percent="100" />
  </tenured>
  <time totalms="5.590" />
</af>

용어의 의미는 다음과 같다.

  • af는 Allocation Failure의 약자로 새로운 Object를 위한 메모리를 할당받는데 실패했다는 것을 의미한다.
  • gc는 Garbage Collection의 약자로 Allocation Failure에 의해 GC가 발생했다는 것을 의미한다.
  • soa는 Small Object Area의 약자로 크기가 작은 Object들이 거주하는 공간을 의미한다.
  • loa는 Large Object Area의 약자로 크기가 큰 Object들이 거주하는 공간을 의미한다.
  • 'expansion은 Free Memory 부족으로 인해 Heap Expansion이 발생했다는 것을 의미한다.
  • intervalms, timetaken, timems, totalms 등의 값을 통해 GC 수행 시간 정보를 알 수 있다.

이 용어를 이용해서 위의 GC Log를 분석하면 다음과 같은 사실들을 알 수 있다.

  • GC 작업 이전의 Total Heap은 4M(4194304)이며, Free Heap은 200K(209408)였다.
  • GC 과정에서 Expansion이 발생했으며 1M(1048576)만큼 Heap 크기가 증가했다.
  • Mark에 5.154ms, Sweep에 0.138ms가 소요되었으며 Compaction은 일어나지 않았다.
  • GC 작업 후 Free Heap은 1.6M(1695728), Total Heap은 5M(5242880)로 증가했다.


[편집] Throughput Collector

Throughput Collectorgcpolicy(-Xgcpolicy:optthruput) 옵션에 의해 활성화된다. Throughput, 즉 일량을 최대화하게끔 작동한다. Throughput Collector에 의한 GC Dump에는 다음과 같은 정보가 기록된다.

...            
<af type="tenured" id="21" timestamp="Tue Oct 23 00:33:27 2007" intervalms="1441.639">
  <minimum requested_bytes="32" />
  <time exclusiveaccessms="0.055" />
  <tenured freebytes="0" totalbytes="764988928" percent="0" >
    <soa freebytes="0" totalbytes="764988928" percent="0" />
    <loa freebytes="0" totalbytes="0" percent="0" />
  </tenured>   
  <gc type="global" id="21" totalid="21" intervalms="1441.756">
    <compaction movecount="1913517" movebytes="123114336" reason="compact to aid heap contraction" />
    <contraction type="tenured" amount="38248960" newsize="726739968" timetaken="0.949" reason="excess free space following gc" />
    <refs_cleared soft="0" weak="0" phantom="0" />
    <finalization objectsqueued="0" />
    <timesms mark="315.329" sweep="5.649" compact="443.578" total="767.525" />
    <tenured freebytes="603616120" totalbytes="726739968" percent="83" >
      <soa freebytes="603616120" totalbytes="726739968" percent="83" />
      <loa freebytes="0" totalbytes="0" percent="0" />
    </tenured> 
  </gc>        
  <tenured freebytes="603550584" totalbytes="726739968" percent="83" >
    <soa freebytes="603550584" totalbytes="726739968" percent="83" />
    <loa freebytes="0" totalbytes="0" percent="0" />
  </tenured>   
  <time totalms="767.678" />
</af>   
...

IBM JVM은 기본적으로 Generation을 사용하지 않기 때문에 Minor GCMajor GC의 구분이 없다. Generation을 사용하지 않기 때문에 항상 모든 Heap 영역이 GC 대상이 된다. gc type="global"이 의미하는 바가 이것이다.

[편집] Response Time Collector

Response Time Collectorgcpolicy(-Xgcpolicy:optavgpause) 옵션에 의해 활성화된다. Response Time, 즉 응답 시간을 최적화하게끔 작동한다. Response Time Collector에 의한 GC Dump에는 다음과 같은 정보가 기록된다.

...
<af type="tenured" id="9" timestamp="Tue Oct 23 00:34:10 2007" intervalms="8099.846">
  <minimum requested_bytes="88" />
  <time exclusiveaccessms="0.036" />
  <tenured freebytes="0" totalbytes="1072750592" percent="0" >
    <soa freebytes="0" totalbytes="1072750592" percent="0" />
    <loa freebytes="0" totalbytes="0" percent="0" />
  </tenured>
  <con event="completed full sweep" timestamp="Tue Oct 23 00:34:10 2007">
    <stats sweepbytes="0" sweeptime="0.088" connectbytes="0" connecttime="0.003" />
  </con>
  <gc type="global" id="20" totalid="20" intervalms="1752.723">
    <refs_cleared soft="0" weak="0" phantom="0" />
    <finalization objectsqueued="0" />
    <timesms mark="320.279" sweep="218.930" compact="0.000" total="539.259" />
    <tenured freebytes="261405180" totalbytes="1072750592" percent="24" >
      <soa freebytes="261405180" totalbytes="1072750592" percent="24" />
      <loa freebytes="0" totalbytes="0" percent="0" />
    </tenured>
  </gc>
  <tenured freebytes="261404428" totalbytes="1072750592" percent="24" >
    <soa freebytes="261404428" totalbytes="1072750592" percent="24" />
    <loa freebytes="0" totalbytes="0" percent="0" />
  </tenured>
  <time totalms="539.514" />
</af>
...

Response Time Collector 또한 Generation을 사용하지 않는다. 따라서 Throughput Collector와 같이 gc type="global"로 표현된다.

[편집] Concurrent Generational Collector

Concurrent Generational Collectorgcpolicy(-Xgcpolicy:gencon) 옵션에 의해 활성화된다. IBM JDK 1.5에서 새롭게 추가되었으며 Sun Hotspot JVM의 CMS Collector와 매우 유사한 기법을 사용한다. Concurrent Generational Collector에 의한 GC Dump에는 다음과 같은 로그가 기록된다.

...
<af type="nursery" id="91" timestamp="Tue Oct 23 00:34:50 2007" intervalms="27.674">
  <minimum requested_bytes="32" />
  <time exclusiveaccessms="0.053" />
  <nursery freebytes="0" totalbytes="38255104" percent="0" />
  <tenured freebytes="92785912" totalbytes="372438528" percent="24" >
    <soa freebytes="92785912" totalbytes="372438528" percent="24" />
    <loa freebytes="0" totalbytes="0" percent="0" />
  </tenured>
  <gc type="scavenger" id="91" totalid="101" intervalms="27.755">
    <flipped objectcount="161001" bytes="9015948" />
    <tenured objectcount="300702" bytes="16428048" />
    <refs_cleared soft="0" weak="0" phantom="0" />
    <finalization objectsqueued="0" />
    <scavenger tiltratio="60" />
    <nursery freebytes="30438400" totalbytes="40268800" percent="75" tenureage="1" />
    <tenured freebytes="74960120" totalbytes="372438528" percent="20" >
      <soa freebytes="74960120" totalbytes="372438528" percent="20" />
      <loa freebytes="0" totalbytes="0" percent="0" />
    </tenured>
    <time totalms="86.476" />
  </gc>
  <nursery freebytes="30436352" totalbytes="40268800" percent="75" />
  <tenured freebytes="74960120" totalbytes="372438528" percent="20" >
    <soa freebytes="74960120" totalbytes="372438528" percent="20" />
    <loa freebytes="0" totalbytes="0" percent="0" />
  </tenured>
  <time totalms="86.610" />
</af>
...

Concurrent Generational Collector는 Generation에 기반한다. 따라서 Minor GCMajor GC와 같은 구분이 존재한다. IBM JVM에서는 Scavenger GCGlobal GC라는 용어가 사용된다. 위의 예에서 af type="nursery", gc type="scavenger"가 의미하는 것은 Nursery, 즉 Young Generation에서 GC가 발생했으며, Scavenger GC, 즉 Minor GC가 발생했다는 것을 의미한다.

[편집] 관련 정보

  1. Garbage Collector

[편집] 외부 참조

 
:
Posted by 라면스프


출처 : http://theeye.pe.kr/entry/Flex-BlazeDS-with-Spring-Annotation?category=11


Flex 개발을 하다보면 서버와의 통신을 통해 다양한 방법을 사용할수 있다는 장점을 쉽게 알 수 있습니다.

하지만 안타까운게 Remote Object를 사용하기 위해서는 얼마인지 산출하기도 힘든 비싼 FDS (LCDS)를 구매해야 한다는 장벽이 있었죠.

이 장벽에 막혀 안정성이 확보되지 못한 일부 오픈 소스제품군을 사용하거나 다른 방식의 통신을 사용하여야 했습니다.

하지만 LCDS의 빠른 속도를 보장받을수는 없었죠. 현재 LCDS의 Remote Object 통신 프로토콜은 AMF3 (Action Message Format 3)까지 나왔습니다.

하지만 Adobe에서 BlazeDS라는 이름의 LCDS 무료버젼을 내놓았습니다. 또한 오픈소스로 개발 진행중입니다.

또한 Jeff Vroom 이라는 멋진 분이 Spring ↔ BlazeDS 간 통신할 수 있는 Factory를 개발하였습니다.

관련 정보는 다음을 참고하세요

[ 어도비 기술문서 ]
[ Sewon님 블로그 ]
[ 머드초보님 블로그 ]

하지만 위의 기술 내용들은 Spring Framework를 이용하여 어노테이션 기반으로 개발중이라면 여간 성가시게 만드는 부분이 많지 않은가 싶습니다.

위의 내용도 매우 간단해 지고 쉬워졌지만 BlazeDS도 어노테이션을 이용해 연동할 수 있으면 얼마나 좋을까 생각하게 만들었습니다.

그러던중에 좋은 자료를 발견하였습니다.

1. Spring에서 @RemotingDestination 어노테이션을 사용하기 위해 다음의 라이브러리를 다운받습니다. 여기에는 Jeff Vroom씨가 만든 Spring Factory도 포함하고 있습니다.

[ 다운받으러 가기 ]

2. remotingdestination-annotation.zip 파일을 개발중인 프로젝트의 WEB-INF/lib 디렉토리에 넣어줍니다.

3. BlazeDS의 설정파일인 services-config.xml 에 SpringAutowiringBootStrapService를 등록해 줍니다.

<?xml version="1.0" encoding="UTF-8"?>
<services-config>
   
<services>
       
<service-include file-path="remoting-config.xml" />
       
<service-include file-path="proxy-config.xml" />
       
<service-include file-path="messaging-config.xml" />
           
<service id="spring-autowiring-bootstrap-service"
               
class="flex.contrib.services.SpringAutowiringBootstrapService"/>
       
<default-channels>
           
<channel ref="my-amf"/>
       
</default-channels>
   
</services>


....

   
<factories>
       
<factory id="spring" class="flex.contrib.factories.flex.SpringFactory" />
   
</factories>
</services-config>


SpringAutowiringBootStrapService은 BlazeDS 로딩시에 모든 @RemotingDestination 어노테이션이 포함된 클래스를 등록합니다. 이것은 Spring Factory를 통해 동적으로 Spring의 Bean을 불러다 사용할 수 있음을 뜻합니다. 밑에 추가한 factory의 경우 id는 꼭 spring이어야 합니다.

4. 마지막으로 당신의 서비스 클래스에 @RemotingDestination 어노테이션을 붙여줍니다.
package flex.contrib.samples.mortgage;


import org.springframework.beans.factory.annotation.Autowired;
import flex.contrib.stereotypes.RemotingDestination;


@RemotingDestination(destination="mortgageService")
public class Mortgage {
   
@Autowired RateFinder rateFinder;
   
public void setRateFinder(RateFinder rateFinder) {
       
this.rateFinder = rateFinder;
   
}


    public double calculate(double amount) {
       
int term = 360; // 30 years
       
double rate = rateFinder.findRate();
       
return (amount*(rate/12)) / (1 - 1 /Math.pow((1 + rate/12), term));
   
}
}


5. 물론 Spring에서 component-scan과 annotation-config를 설정해 주는걸 잊지 말자고요.
<?xml version="1.0" encoding="UTF-8"?>
<beans xmlns="http://www.springframework.org/schema/beans"
       
xmlns:xsi="http://www.w3.org/2001/XMLSchema-instance"
       
xmlns:context="http://www.springframework.org/schema/context"
       
xsi:schemaLocation="http://www.springframework.org/schema/beans
           
http://www.springframework.org/schema/beans/spring-beans-2.5.xsd
           
http://www.springframework.org/schema/context
           
http://www.springframework.org/schema/context/spring-context-2.5.xsd">


    <context:annotation-config/>
   
<context:component-scan base-package="flex.contrib.samples"/>
</beans>


6. Flex 에서는 다양한 방법의 Remote Object 통신방법으로 서버의 서비스에 직접 접근할 수 있게 됩니다.
var amfChannel:AMFChannel = new AMFChannel("my-amf", "http://localhost/messagebroker/amf");
var channelSet:ChannelSet = new ChannelSet();
channelSet
.addChannel(amfChannel);
   
var remoteObject:RemoteObject = new RemoteObject();
remoteObject
.channelSet = channelSet;
remoteObject
.destination = "mortgageService";
remoteObject
.addEventListener(ResultEvent.RESULT, resultHandler);
remoteObject
.addEventListener(FaultEvent.FAULT, faultHandler);
remoteObject
.calculate(5);


+. @RemotingDestination에서 지정한 destination이 Flex에서 지정하는 destination이 됩니다. 주의할점이 하나 있는데 web.xml의 contextConfigLocation 설정에서 정의한 컨텍스트의 Bean만 가져올 수 있습니다.

참고자료 : http://marceloverdijk.blogspot.com/2008/01/code-by-convention-with-flex-and-spring.html


:
Posted by 라면스프
2008. 11. 12. 17:55

[js] 외국 현재 시각 구하기 Enjoy/JSP2008. 11. 12. 17:55

출처 : http://mwultong.blogspot.com/2007/05/javascript-world-time-timezone.html


파일명: example.html
<script type="text/javascript">

document.write('KST (한국 표준시):<br />',       getWorldTime(+9), '<br /><br />');

document.write('PST (태평양 표준시):<br />',     getWorldTime(-8), '<br /><br />');
document.write('PDT (태평양 표준시 DST):<br />', getWorldTime(-7), '<br /><br />');

document.write('EST (뉴욕 시간):<br />',         getWorldTime(-5), '<br /><br />');
document.write('EDT (뉴욕 시간 DST):<br />',     getWorldTime(-4), '<br /><br />');

document.write('CET (파리 시간):<br />',         getWorldTime(+1), '<br /><br />');
document.write('CEST (파리 시간 DST):<br />',    getWorldTime(+2), '<br /><br />');

document.write('CST (중국 표준시):<br />',       getWorldTime(+8), '<br /><br />');

document.write('UTC (세계 표준시):<br />',       getWorldTime(0),  '<br /><br />');


function getWorldTime(tzOffset) { // 24시간제
  var now = new Date();
  var tz = now.getTime() + (now.getTimezoneOffset() * 60000) + (tzOffset * 3600000);
  now.setTime(tz);


  var s =
    leadingZeros(now.getFullYear(), 4) + '-' +
    leadingZeros(now.getMonth() + 1, 2) + '-' +
    leadingZeros(now.getDate(), 2) + ' ' +

    leadingZeros(now.getHours(), 2) + ':' +
    leadingZeros(now.getMinutes(), 2) + ':' +
    leadingZeros(now.getSeconds(), 2);

  return s;
}


function leadingZeros(n, digits) {
  var zero = '';
  n = n.toString();

  if (n.length < digits) {
    for (i = 0; i < digits - n.length; i++)
      zero += '0';
  }
  return zero + n;
}
</script>


위의 소스를 파일로 저장한 후, 브라우저로 보면 현재 세계 시각이 다음과 같은 식으로 나옵니다.
결과화면

 KST (한국 표준시):
2007-05-21 16:15:27

PST (태평양 표준시):
2007-05-20 23:15:27

PDT (태평양 표준시 DST):
2007-05-21 00:15:27

EST (뉴욕 시간):
2007-05-21 02:15:27

EDT (뉴욕 시간 DST):
2007-05-21 03:15:27

CET (파리 시간):
2007-05-21 08:15:27

CEST (파리 시간 DST):
2007-05-21 09:15:27

CST (중국 표준시):
2007-05-21 15:15:27

UTC (세계 표준시):
2007-05-21 07:15:27

:
Posted by 라면스프
2008. 11. 12. 13:58

LSOF 설치 및 사용가이드 Enjoy/etc2008. 11. 12. 13:58


출처 : http://unix.co.kr/bbs/board.php?bo_table=02_06&wr_id=6


LSOF 설치 및 사용가이드

2001. 6.30

공재순/ kong@certcc.or.kr

1. 소개

LSOF는 'List Open File'의 약자로, 해당 System에서 구동되고 있는 프로세스들에 의해서 열려진 파일들을 확인 할 수 있는 툴이다. 시스템의 의심스러운 프로세스에 대한 확인이 용이하고, 설치가 비교적 쉬워 많이 이용되고 있다.

[cert:root]:/user/kong/lsof_4.56> lsof
COMMAND PID USER FD TYPE DEVICE SIZE/OFF NODE NAME
sched 0 root cwd VDIR 32,0 1024 2 /
sched 0 root 0u VCHR 12,2 0t0 140375 /devices/pseudo/sad@0:user(COMMON)
.....
.....
sendmail 23403 root 13u inet 0x603ca5b8 0t2290 TCP cert:52969->211.45.162.90:smtp (ESTABLISHED)
sendmail 23403 root 14u inet 0x603ca5b8 0t2290 TCP cert:52969->211.45.162.90:smtp (ESTABLISHED)
......

[그림 1] LSOF 실행 예

Top

2. LSOF 다운로드 받기

최신 버전은 ftp://vic.cc.purdue.edu/pub/tools/unix/lsof 에서 확인 할 수 있으며, 여러 개의 Mirror site 가 존재해 쉽게 다운로드 받을 수 있다.

Mirror site URL :

* ftp://ftp.cerias.purdue.edu/pub/tools/unix/sysutiles/lsof
* ftp://ftp.cert.dfu.du/pub/tools/admin/lsof
* ftp://ftp.cetis.hvu.nl/pub/lsof
* ftp://ftp.crc.doc.ca/packages/

Version 4 LSOF 는 gzip으로 압축되어 있으며, 파일명에 revision number를 포함하고 있다.

ftp://vic.cc.purdue.edu/pub/tools/unix/lsof_<rev>_W.tar.gz
또는 ftp://vic.cc.purdue.edu/pub/tools/unix/lsof_<rev>_W.tar.Z

※ 리눅스 시스템의 경우에는, 대부분 기본적으로 LSOF가 설치되어 있다. (만약 설치가 안되어 있는 상태라면 rpm 패키지로 배포하고 있으므로 linux 배포사이트를 이용하면 될 것이다.)

Top

3. 압축해제

이 문서에서는 ver.4(revision 4.56) LSOF를 Solaris OS에서 설치하는 과정을 보이도록 한다.

gzip -d lsof_4.56_W.tar.gz
tar -xvf lsof_4.56_W.tar

※ 참고로 4.56 버전의 lsof.tar 파일의 md5 checksum 값은 다음과 같으며, MD5 (lsof_4.56.tar) = 92155bb6430d14d044f8ca96858e63b8

md5 checksum tool은 아래 사이트에서 구할 수 있다.
ftp://ftp.cerias.purdue.edu/pub/tools/unix/crypto/md5

Top

4. 설치하기

LSOF 설치과정은 크게 압축해제 -> Inventory -> Configure -> Install 4단계로 볼 수 있다.

① 압축 풀기

우선 초기 Wrapper에 쌓인 파일 압축을 풀면 해당 디렉토리 내에 다음과 같은 5개 의 파일이 생성되고, 이와 함께 lsof_4.56 디렉토리가 생성된다.

[cert:root]:/user/kong> tar -xvf lsof_4.56_W.tar
x RELEASE.SUMMARY_4.56, 12803 bytes, 26 tape blocks
x README.lsof_4.56, 4129 bytes, 9 tape blocks
x 00.README.FIRST_4.56, 700 bytes, 2 tape blocks
x lsof_4.56.tar, 3317760 bytes, 6480 tape blocks
x lsof_4.56.tar.asc, 284 bytes, 1 tape blocks

생성되는 파일

설명

00.README.FIRST_4.56

Readme file for the distribution

README.lsof_4.56

Contains distribution and security information

RELEASE.SUMMARY_4.56

Summary of the lsof 4.56 distribution

lsof_4.56.tar

LSOF 4.56 tar archive

lsof_4.56.tar.asc

Detached PGP certificate for lsof_4.56.tar

[표 1] lsof_4.56_W.tar 압축 해지 후 생성되는 파일들

Top

※ 생성된 lsof_4.56 디렉토리에 생성되는 주요 파일들

[sparc5:root]:/user/kong/lsof_4.56> ls
./ 00DIST 00README arg.c lsof_fields.h proto.h
../ 00FAQ 00XCONFIG dialects/ main.c regex.h
00.README.FIRST 00LSOF-L AFSConfig* lib/ misc.c scripts/
00CREDITS 00MANIFEST Configure* lsof.8 node.c store.c
00DCACHE 00PORTING Customize* lsof.h print.c usage.c
00DIALECTS 00QUICKSTART Inventory* lsof.man proc.c version

② Inventory

LSOF를 설치 할때 절대적으로 필요한 과정은 아니다. 그러나 subdirectory들을 체크하고, 각 스크립트들과 파일 헤더들, 소스파일들이 실제로 존재하는지 등 패키지 상태를 체크 해 볼 필요가 있다. 다음과 같이 Inventory 스크립트를 실행하게 되면, inventory 작업에 대한 소개 가 나오고 실행할 것인지 여부를 물어오는데 'y' 로 답하면서 진행하게 되면 디렉토리들의 list 를 확인할 수 있다.

[cert:root]:/user/kong/lsof_4.56> ./Inventory
Conducting an inventory of the lsof distribution; this will take a while.
Examining /user/kong/lsof_4.56: OK
Examining dialects: OK
....
....
Examining lib: OK
Examining scripts: OK
This lsof distribution seems to be complete.

Top

③ Configure

환경설정에 필요한 여러 단계의 작업을 하게 되는데, 아래와 같이 해당 OS에 맞 게 선택하고 Configure 스크립트를 구동하면 된다.

※Configure 스크립트 구동방법

Configure <options> <target-dialect>
<options>: -clean : clean up previous configuration
-d|-dialects : display a list of supported dialect versions
-h|-help : display help information
-n : avoid AFS, customization, and inventory checks

aix | aixgcc : IBM AIX xlc (aix)
or gcc (aixgcc)
bsdi : BSDI BSD/OS
darwin : Apple Darwin
decosf : DEC OSF/1
digital_unix|du : Digital UNIX
freebsd : FreeBSD
hpux|hpuxgcc : HP-UX cc (hpux)
or gcc (hpuxgcc)
linux : Linux
netbsd : NetBSD

nextstep|next|ns|nxt : NEXTSTEP
openbsd : OpenBSD
openstep|os : OpenStep
osr | sco : SCO OpenServer,
SCO devloper's compiler
osrgcc|scogcc : SCO OpenServer,gcc compiler
ptx : Sequent PTX
solaris | solariscc : Solaris gcc (solaris)
or cc(solariscc)
tru64 : Tru64 UNIX
unixware | uw : SCO UnixWare

[표 2] Configure 스크립트 구동시 OS 지정

Top

[sparc5:root]:/user/kong/lsof_4.56> ./Configure solaris
Testing prdata.h for PR_GWINDOWS, using gcc
Testing prdata.h for PR_LDT, using gcc
Testing vnode.h for VSOCK, using gcc
.....

각 헤더파일 testing이 끝나면, 다시 inventory 해 볼 것인지를 물어보는데 file tree들을 변화시킬 것이 없다면 inventory과정을 re-run할 필요없다.

....
....
Do you want to take inventory (y|n) [y]? n
rm -f ddev.c dfile.c dlsof.h dmnt.c dnode*.c dproc.c dproto.h dsock.c dstore.c kernelbase.h machine.h machine.h.old new_machine.h __lseek.s Makefile
ln -s dialects/sun/ddev.c ddev.c
ln -s dialects/sun/dfile.c dfile.c
ln -s dialects/sun/dlsof.h dlsof.h
.....
ln -s dialects/sun/machine.h machine.h
kernelbase.h assembled.
Makefile and lib/Makefile created.

Top

위 과정에서 Make 파일이 생성됨을 볼 수 있으며, 이어 LSOF를 customize 할 것인지를 물어오는데 [yes/no] question을 따라 다음의 각 옵션을 사용자가 선택할 수 있다.

Name

Description

Default Value

HASSECURITY

enabled : root 만이 lsof를 이용해 열려진 파일들을 확인 할 수 있음.
disabled :누구든 모든 열려진 파일들을 lsof를 이 용해 확인 할 수 있음.

Disabled

WARNINGSTATE

enabled : lsof가 필요할 경우 언제든지 warning messages를 출력함.
disabled : warning messages를 출력하지 않음. -w (disables) +w (enables) 로 조절 가능함.

Enabled

WARNDEVACCESS

enabled : lsof가 /dev (또는 /devices)를 억세스 할 수 없을 때, warning messages를 출력함.
disabled : lsof가 /dev (또는 /devices)를 억세스 할 수 없을 때, skip 해 버림.

Enabled

HASDCACHE

enabled : lsof가 /dev (또는 /devices)의 파일들에 관한 정보를 포함하고 있는
device cache file을 생성함.

< define path options >

HASENVDC, HASPERSDC,
HASPERSDCPATH, HASSYSDC
disabled : lsof 가 device cache file 생성하지 않음.

Enabled

HASENVDC

HASPERSDC

HASPERSDCPATH

HASDCACHE를 정의하면, device cache file path를 기술하기 위해 연관된
다른 옵션들의 구성도 정의해 주어야 한다.

< 현재 설정된 path options >

#define HASENVDC "LSOFDEVCACHE"
#define HASPERSDC "%h/%p.lsof_%L"
#define HASPERSDCPATH "LSOFPERSDCPATH"
※ 자세한 사항은 00DCACHE ,00FAQ 참고

"LSOFDEVCACHE"

"%h/%p.lsof_%L"

"LSOFPERSDCPATH"

HASKERNIDCK

lsof가 현재의 커널상태와 최초 lsof가 설치되어 구동되었을 당시의 커널과 비교하여,
시스템에서 부적절하게 실행되는 것을 탐지할 수 있다.

kernel identity check로 인해 일부 UNIX
(예:AIX) 시스템에서 구동시간이 많이 걸리는 경우가 있어서 disable 시켜야 할 때가 있을 수도 있지만,
lsof를 부적절하게 구동함으로써 오는 위험요소가 증가할 수 있다는 것을 배제할 수 없다.

Enabled

[표 3] Customize 옵션

Top

위의 각 항목들 및 설정값들은 LSOF가 기본적으로 제공하는 것으로 변경을 원할 경우에는 machine.h 파일을 직접 수정하거나 Customize 스크립트를 직접 구동하여 변경할 수도 있다.

④ build & install

Configure 과정을 마치고 나면, 시스템에 인스톨 할 수 있다. 기본적인 install 과 정은 아래와 같다.

■ build LSOF system

[cert:root]:/user/kong/lsof_4.56> make
(cd lib; make DEBUG="-O" CFGF="-Dsolaris=20600 -DHASPR_GWINDOWS -DHAS_VSOCK -DLSOF_VSTR=\"5.6\"")
gcc -Dsolaris=20600 -DHASPR_GWINDOWS -DHAS_VSOCK -DLSOF_VSTR="5.6" -O -c ckkv.c
.....
.....
gcc -o lsof -Dsolaris=20600 -DHASPR_GWINDOWS -DHAS_VSOCK -DLSOF_VSTR=\"5.6\" -O ddev.o dfile.o dmnt.o dnode.o dnode1.o dnode2.o dproc.o dsock.o dstore.o arg.o main.o misc.o node.o print.o proc.o store.o usage.o -L./lib -llsof -lkvm -lelf -lsocket -lnsl

Top

■ Install LSOF system

[cert:root]:/user/kong/lsof_4.56> make install
(cd lib; make DEBUG="-O" CFGF="-Dsolaris=20600 -DHASPR_GWINDOWS -DHAS_VSOCK -DLSOF_VSTR=\"5.6\"")
Constructing version.h
gcc -Dsolaris=20600 -DHASPR_GWINDOWS -DHAS_VSOCK -DLSOF_VSTR=\"5.6\" -O -c usage.c
gcc -o lsof -Dsolaris=20600 -DHASPR_GWINDOWS -DHAS_VSOCK -DLSOF_VSTR=\"5.6\" -O ddev.o dfile.o dmnt.o dnode.o dnode1.o dnode2.o dproc.o dsock.o dstore.o arg.o main.o misc.o node.o print.o proc.o store.o usage.o -L./lib -llsof -lkvm -lelf -lsocket -lnsl

여기까지 과정을 마치면 일반적인 설치는 모두 끝나고 lsof 실행파일이 생성된다.

※ 별도로 install ruleset 지정하고자 할 경우

가상메모리의 커널 image를 담고있는 파일인 /dev/kmem(또는 /dev/mem)를 read 할 수 있도록 LSOF는 setgid 로 설치되어야 하는데, 일반적으로 다음과 같은 ruleset 형태로 지정한다.

SunOS install rule actions :
install <options> -m 2755 -g kmem lsof <bin_dest>
install <options> -m 444 lsof.8 <man_dest>
Solaris install rule actions :

install -[cf] <bin_dest> <options> -m 2755 -g sys lsof
install -[cf] <man_dest> <options> -m 444 lsof.8

Top

5. LSOF 사용하기

■ LSOF 옵션

옵션

기 능

옵션

기 능

-?
-h

list help

-a

AND selections (OR)

-d
-D

s select by FD set
D ?|i|b|r|u[path]

+|-f

-files +filesys

-l

list UID numbers

-n
-N

no host names
select NFS files

-s

list file size

-t
-T

terse listing
disable TCP/TPI info

-v
-V

display version info
verbose search

-F [f]

select fields;-F? for help

-o o

o 0t offset digits (8)

-S [t]

t second stat timeout(15)

-i i

select by IPv4 address: [proto][@host|addr][:svc_list|port_list]

+|-r [t]

repeat every t seconds (15);
+ until no files, - forever

-b

avoid kernel blocks

-c c

list command c

-P

no port names

-i

select IPv4 files

-p s

select by PID set

-C

no kernel name cache

+|-w

Warnings (+)

-R

list paRent PID

-k k

kernelsymbols (/dev/ksyms)

-U

select Unix socket

-u s

exclude(^)/select login/UID s

-m m

kernel memory (/dev/kmem)

+|-M

portMap registration (-)

--

end option scan

-g [s]

select by process group ID set and print process group IDs

names

select named files or files on named file systems

Top

■ 실행결과 보기

실행결과에 해당되는 각 column 들을 간단하게 살펴보면 다음 [표5] 와 같다.

Column

설 명

Command

프로세스와 관련된 Unix command 이름

PID
PPID
PGRP

Process IDentification number

Parent Process IDentification number
(해당 프로세스의 부모 프로세스 ID)

Process Group IDentification number
(해당 프로세스와 관련된 프로세스 그룹 ID)

USER

해당 프로세스를 소유한 사용자 ID 또는 login name

FD

File Descriptor number
(ex) cwd : current working directory
r : read access / w : write access / u : read and write access

TYPE

해당 파일과 관련한 노드 타입
(ex) inet : Internet domain socket

DEVICE

device number

SIZE
SIZE/OFF
OFFSET

file 이나 file offset의 사이즈

INODE
NODE-ID

local file 의 node number 또는 Internet protocol type
또는 서버 호스트의 NFS file의 inode number

NAME

해당 파일이 소속된 mount point나 파일 시스템의 이름

[표 6] lsof 실행결과의 각 Column

Top

■ LSOF 주요 옵션 사용 예

* 특정 파일을 억세스하고 있는 프로세스 확인 : lsof <path/file-name>

[cert:root]:/> lsof /etc/passwd
COMMAND PID USER FD TYPE DEVICE SIZE/OFF INODE NAME
ns-httpd 244 root 9r VREG 32,0 3044 99217 /etc/passwd
....

* internet socket 확인 : lsof -i

Internet address 출력형식 : [protocol][@hostname|hostaddr][:service|port]

Top

- 특정 호스트(또는 ip)에 대한 접속 확인

[cert:root]:/> lsof -i@172.16.2.146
COMMAND PID USER FD TYPE DEVICE SIZE/OFF INODE NAME
in.telnet 10124 root 0u inet 0x61d4b788 0t71 TCP cert:telnet->172.16.2.146:1109 (ESTABLISHED)
in.telnet 10124 root 1u inet 0x61d4b788 0t71 TCP cert:telnet->172.16.2.146:1109 (ESTABLISHED)
in.telnet 10124 root 2u inet 0x61d4b788 0t71 TCP cert:telnet->172.16.2.146:1109 (ESTABLISHED)
.....

- 특정 포트로 접속한 리스트 확인

[cert:root]:/usr/sbin> lsof -i @certcc.or.kr:23
COMMAND PID USER FD TYPE DEVICE SIZE/OFF INODE NAME
in.telnet 104 root 2u inet 0x612df850 0t152 TCP cert:telnet->172.16.2.159:1176 (ESTABLISHED)
in.telnet 28462 root 0u inet 0x61aee578 0t71 TCP cert:telnet->172.16.2.146:4250 (ESTABLISHED)
.....

Top

* 특정 user가 오픈한 프로세스를 확인 : lsof -u <loginname> 혹은 lsof -u <UID>

[cert:root]:/> lsof -u kong
COMMAND PID USER FD TYPE DEVICE SIZE/OFF INODE NAME
csh 21309 kong cwd VDIR 32,4 1536 223602 /user/kong/lsof_4.56
csh 21309 kong txt VREG 32,6 158608 298136 /usr/bin/csh
.......

- 특정사용자 제외시 "^" 심볼을 사용하고, 여러명을 동시에 지정하려면 ","를 이용한다.

[cert:root]:/dev/pts> lsof -u ^root,kong,yjkim
COMMAND PID USER FD TYPE DEVICE SIZE/OFF INODE NAME
csh 8992 yjkim cwd VDIR 32,0 1024 2 /
csh 8992 yjkim txt VREG 32,6 158608 298136 /usr/bin/csh
csh 8992 yjkim txt VREG 32,6 70996 136979 /usr/lib/locale/ko/ko.so.1
csh 8992 yjkim txt VREG 32,6 1024888 6749 /usr/lib/libc.so.1
.....
csh 21309 kong cwd VDIR 32,4 1536 223602 /user/kong/lsof_4.56
csh 21309 kong txt VREG 32,6 158608 298136 /usr/bin/csh
....

Top

* 특정 프로세스가 오픈한 파일 리스트 확인 : lsof -p <PID>

- PID 112를 가진 프로세스가 사용하는 파일들 확인

[cert:root]:/usr/sbin> lsof -p 143
COMMAND PID USER FD TYPE DEVICE SIZE/OFF INODE NAME
inetd 143 root cwd VDIR 32,0 1024 2 /
inetd 143 root txt VREG 32,6 33492 310933 /usr/sbin/inetd
inetd 143 root txt VREG 32,6 10696 6352 /usr (/dev/dsk/c0t0d0s6)
....
....
inetd 143 root 4u inet 0x603cab38 0t0 TCP *:ftp (LISTEN)
inetd 143 root 5u inet 0x610b13c0 0t0 TCP *:telnet (LISTEN)
inetd 143 root 6u inet 0x610b1240 0t0 TCP *:pop3 (LISTEN)
......

Top

* ps 명령이 변조된 시스템에서는 의심스러운 포트 확인하기 예

[root@linux /root]# netstat -a
Active Internet connections (including servers)
Proto Recv-Q Send-Q Local Address Foreign Address State
tcp 0 0 *:auth *:* LISTEN
tcp 0 0 *:ftp *:* LISTEN
tcp 0 0 *:telnet *:* LISTEN
tcp 0 0 *:login *:* LISTEN
tcp 0 0 *:2626 *:* LISTEN
.......
[root@linux /dev]# fuser -n tcp 2626
2626/tcp: 607
[root@linux /dev]# lsof -p 607
PID TTY STAT TIME COMMAND
607 ? S 0:00 /usr/sbin/mingetty

※ 참고자료

1. lsof 4.56 README file and man page

2. Installing, configuring and using lsof 4.50 to list open files on systems running Solaris 2.x
http://www.cert.org/security-improvement/implementations/i042.05.html

:
Posted by 라면스프